
Contents
- Quick start
- What you need
- Sign-up and sign-in
- Trial, licence and subscription
- Tour of the screen
- How to (step by step)
- Settings reference
- Tips and tricks
- Troubleshooting
- FAQ
- Updates, backups and your data
- Getting help
1. Quick start
Ten steps from sign-up to your first booking. Each one is covered in detail later in this manual.
- Sign up at app.pjfcsolutions.com/signup. During the pilot you need an invite code.
- Confirm your email from the link we send you. The link works for 3 days.
- Sign in and set up your second sign-in step (authenticator app, email code or Face ID).
- Follow the setup wizard (Studio setup → Setup). Do the steps in any order.
- Add your studio's details and logo. They go on invoices, messages and booking pages.
- Set your packages, prices and shoot times. These drive bookings and invoices.
- Import your clients from a spreadsheet or GoHighLevel. Nobody is sent anything.
- Connect Stripe, Twilio and email in Connections, then add your staff.
- Check the Shadow log. Sending starts switched off, so you can see exactly what would go out.
- Switch sending on from the Shadow log when you're happy. You're live.
2. What you need
- A computer, tablet or phone with a modern browser. Chrome, Safari, Edge or Firefox. PJFC Photo is hosted, so there's nothing to install.
- An email address for each person who signs in. Every person gets their own login.
- A phone for the second sign-in step. An authenticator app (such as Google Authenticator or 1Password), or Face ID / Touch ID. A code by email also works.
- A Stripe account to take card payments. Payments go straight into your own Stripe account, and Stripe charges its own fees.
- A Twilio account and number to send and receive texts. Twilio bills you directly for texts.
- A studio mailbox (for example hello@yourstudio.com.au) and its server details, so emails go from your address and replies come back into Messages.
- Access to your domain's DNS (or the person who looks after your website) if you want to send email from your own domain. Recommended.
- Your client list as a CSV file, or a GoHighLevel private integration token, if you're moving from another system.
You can start without Stripe, Twilio or email. Until they're connected, nothing is sent and no card is charged.
3. Sign-up and sign-in
Sign up
- Go to app.pjfcsolutions.com/signup.
- Enter your business name, your name, email and a password of at least 12 characters.
- Enter your first studio's name and choose its time zone (Perth, Darwin, Adelaide, Brisbane, Sydney / Canberra, Melbourne, Hobart or New Zealand).
- During the pilot, enter the invite code you were given. Sign-up is invite-only until the pilot ends.
- Tick to agree to the terms of service and privacy policy, then submit.
Your business, your owner login and your first studio are created straight away. Each studio gets its own private database.
Confirm your email
We email you a link. Click it to confirm your address. The link works for 3 days. You can't sign in until you've confirmed. If the email doesn't arrive, check your junk folder, or ask for it to be sent again from the sign-up page.
Second sign-in step
Everyone confirms it's them one more way after their password. The first time you sign in, you choose how:
- Authenticator app. Scan the QR code with your app, then type the six-digit code it shows.
- Code by email. We email you a six-digit code each time.
- Code by text message. Only if your login has a mobile number.
- Face ID / Touch ID (passkey). The quickest and safest way. Add it after your first sign-in: open Account → Sign-in security and click Add Face ID / Touch ID. On a desktop without Touch ID, choose "use a phone" and scan the code with your phone.
Tick Remember this device for 30 days when you sign in and that device won't ask again for 30 days. The sign-in page always offers your other ways too, in case you don't have your phone.
To change your password or your usual way, open Account → Sign-in security. You can also forget remembered devices there.
4. Trial, licence and subscription
Free trial
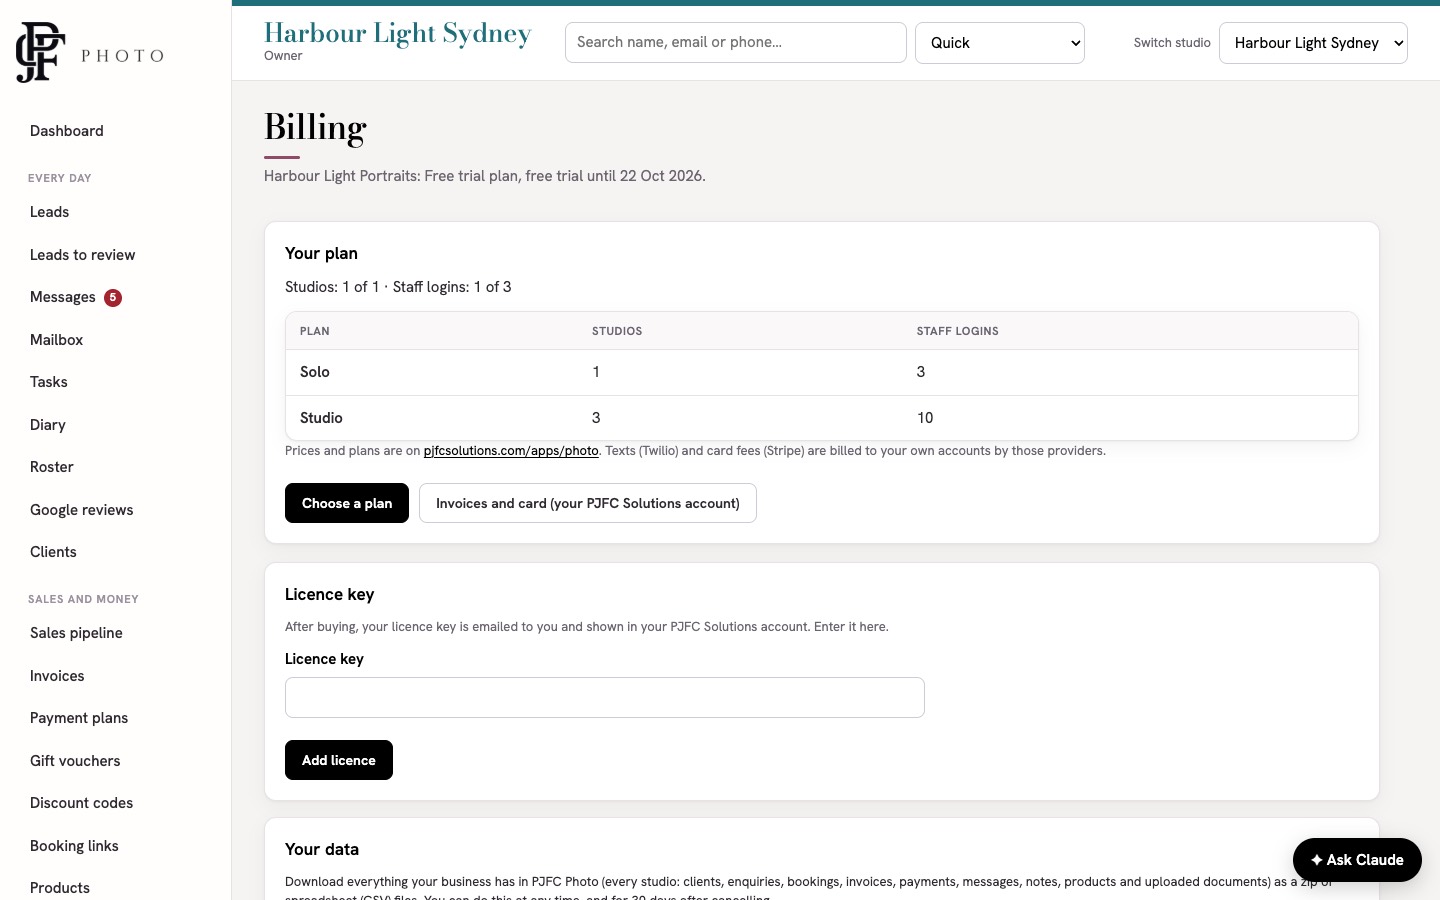
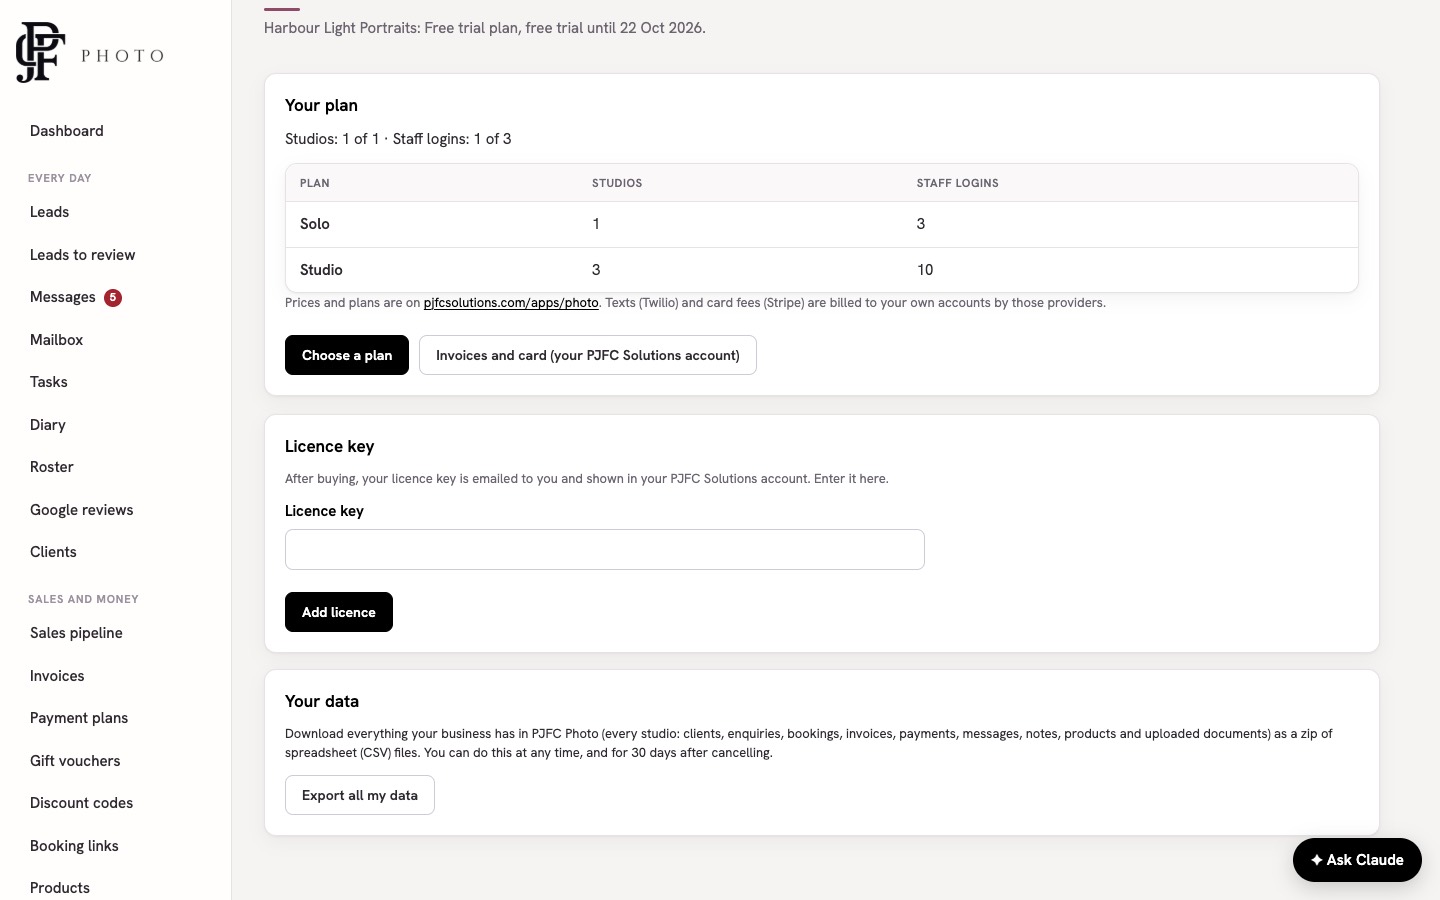
Every new business gets a 14-day free trial. The trial includes 1 studio and up to 3 staff logins. The Setup page and Billing page show the date your trial ends.
Plans
| Plan | Studios | Staff logins |
|---|---|---|
| Solo | 1 | 3 |
| Studio | 3 | 10 |
Prices are on pjfcsolutions.com/apps/photo/. Texts (Twilio) and card fees (Stripe) are separate: those providers bill you directly.
Buy and enter your licence key
- In PJFC Photo, open Billing (owner only) and click Choose a plan. Or go to pjfcsolutions.com/apps/photo/.
- Buy the plan. Your licence key is emailed to you and shown in your PJFC Solutions account.
- Back in Billing, paste the key into Licence key and click Add licence.
- Billing now shows your plan. To change cards or see invoices, click Invoices and card (your PJFC Solutions account).
- Billing also has the Your data panel, where the owner can download everything (see section 11).
If your trial or subscription ends
- PJFC Photo checks your licence once a day.
- If your trial ends without a licence, or your subscription ends or a payment fails, you get 7 days' grace. Billing shows a red notice asking you to renew.
- After the 7 days your account is paused: staff can't sign in and nothing is sent.
- Your data is kept. Renew and enter your key, and you carry on where you left off.
To cancel, see section 11.
5. Tour of the screen
Menu (left)
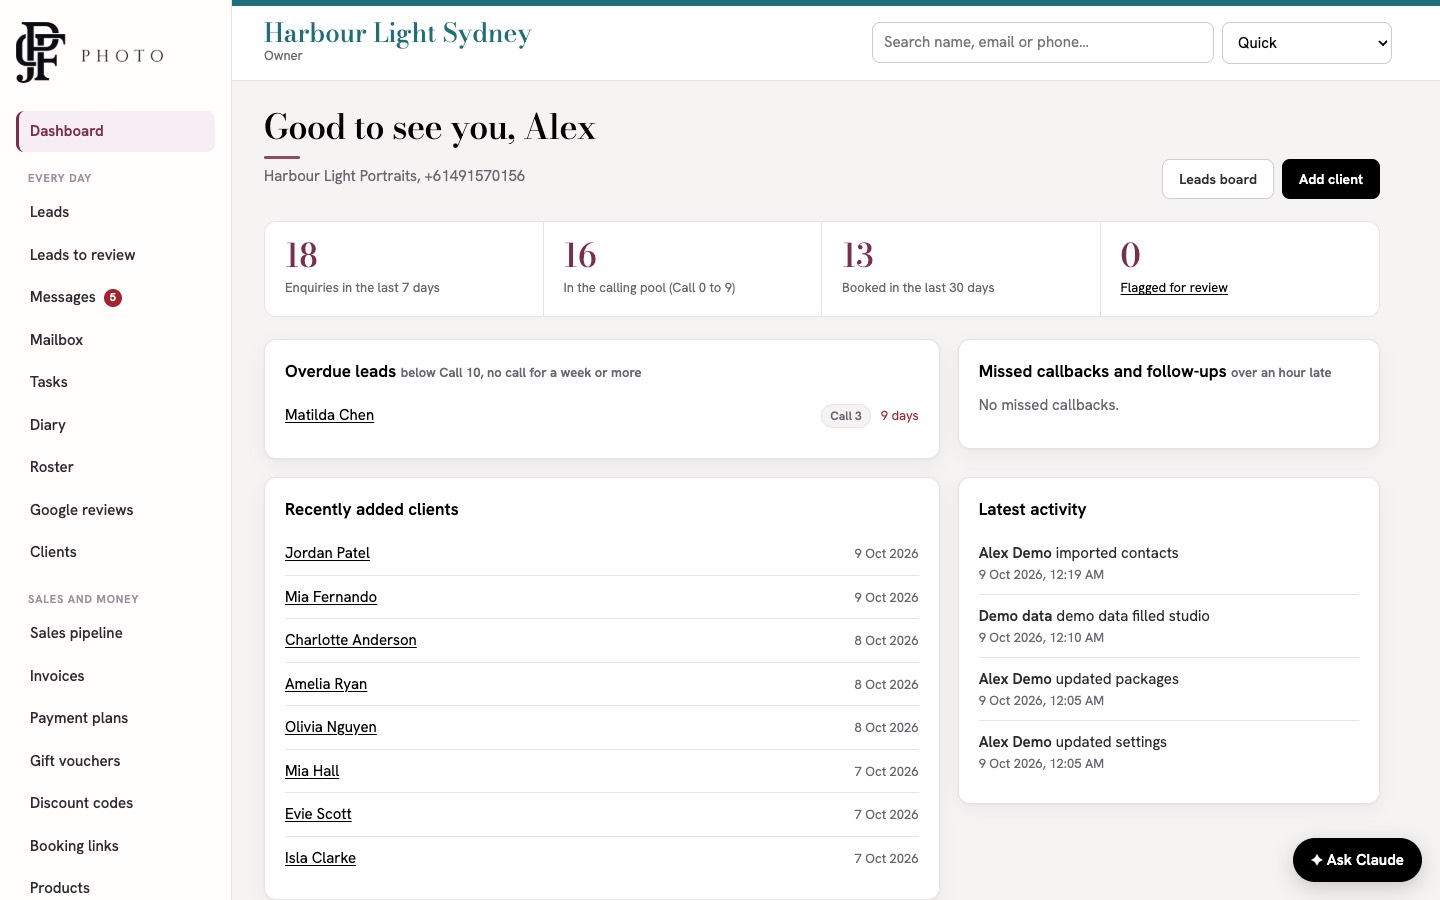
The menu is grouped so daily work comes first. You only see what your role allows.
- Dashboard: your home page.
- Every day: Leads, Leads to review, Messages, Mailbox, Tasks, Diary, Roster, Google reviews and Clients.
- Sales and money: Sales pipeline, Invoices, Payment plans, Gift vouchers, Discount codes, Booking links and Products.
- Results: Reports and Insight.
- Messages: Spam numbers, Message templates, Follow-up schedules, Shadow log and Test leads.
- Staff: Staff access, Roles and Staff mailboxes.
- Studio setup: Setup, Studio details, Packages and prices, Connections, Settings, Website, Activity log, AI helper and Billing.
Top bar
- Studio name and the coloured stripe show which studio you're in.
- Search: type a name, phone number or email. Choose Quick for clients, or Everything to search wider.
- Switch studio appears if you work in more than one studio.
- Account: change your password and sign-in security, or sign out.
Bottom of every page
- Ask Claude (bottom right): the AI helper. See Ask Claude.
- Report a problem: tell the PJFC Photo team something isn't right. It records the page you were on.
On a phone, the menu moves to a bar at the bottom of the screen.
6. How to
Step-by-step guides for everyday jobs. Owners and managers do the setup jobs. Everyone uses the daily ones.
6.1 Setup wizard
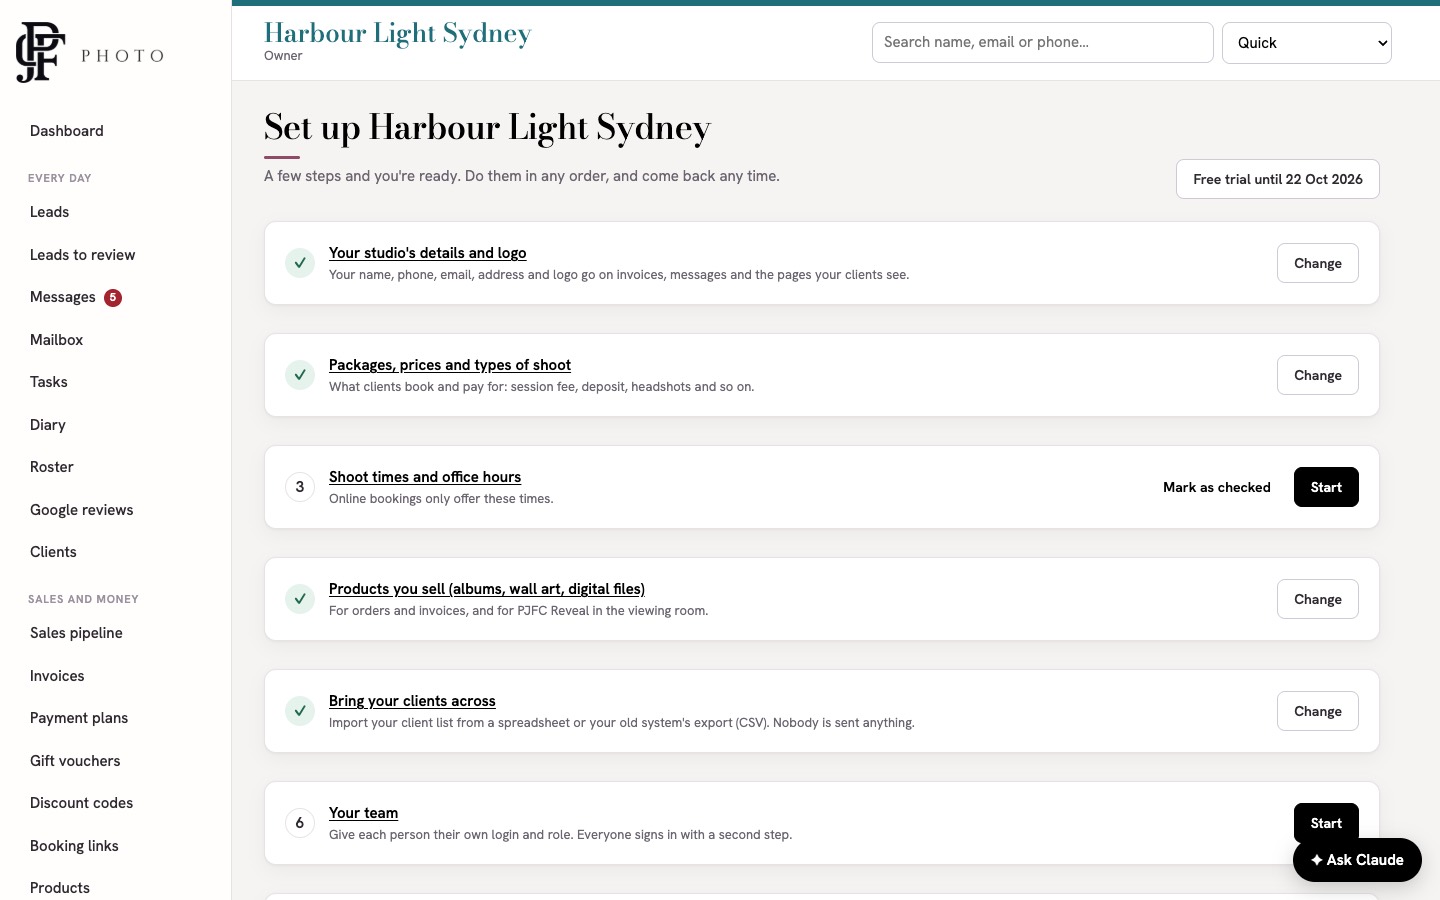
The setup wizard is a checklist of eight steps. It opens after your first sign-in. Find it any time in Studio setup → Setup (owner only).
- Open Setup. Each step shows a tick when it's done.
- Click Start (or Change) on a step to open its page. Save, and you come back to the checklist.
- For steps you only need to check, such as shoot times or welcome messages, click Mark as checked.
- When you're finished, click I'm done for now: go to the dashboard. You can come back any time.
The eight steps: studio details and logo; packages, prices and types of shoot; shoot times and office hours; products; bring your clients across; your team; connections; check your welcome messages.
6.2 Studio details and logo
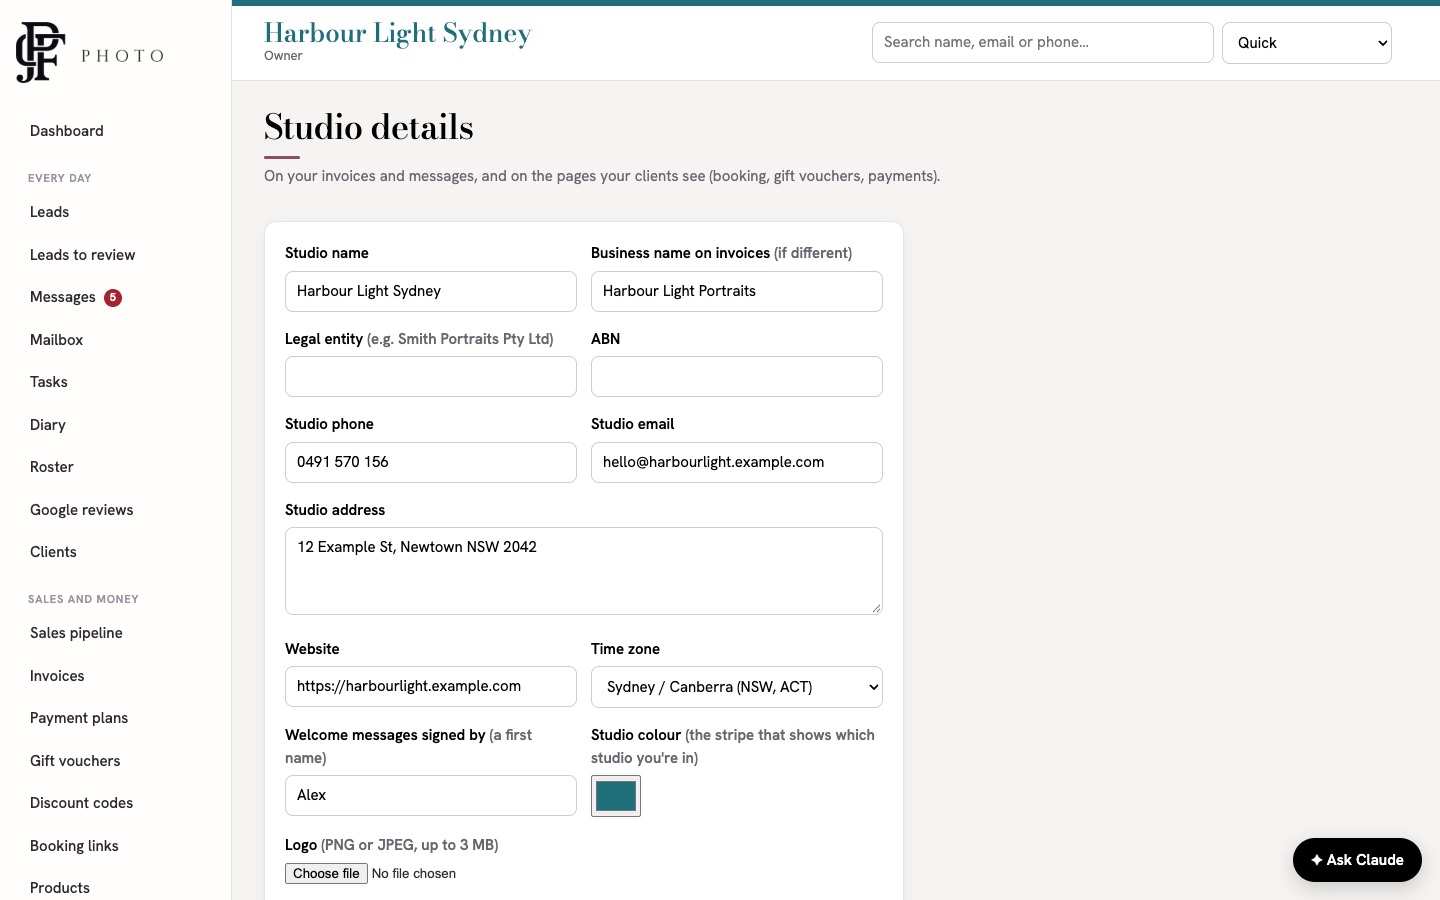
- Open Studio setup → Studio details.
- Enter the studio name, business name on invoices (if different), legal entity, ABN, phone, email, address and website.
- Check the time zone. All times and dates in the studio use it.
- Enter the first name that signs your welcome messages.
- Choose a studio colour. It's the stripe that shows which studio you're in.
- Upload your logo (PNG or JPEG, up to 3 MB), then click Save.
These details appear on invoices, messages and the pages clients see (booking, gift vouchers and payments).
6.3 Packages and prices
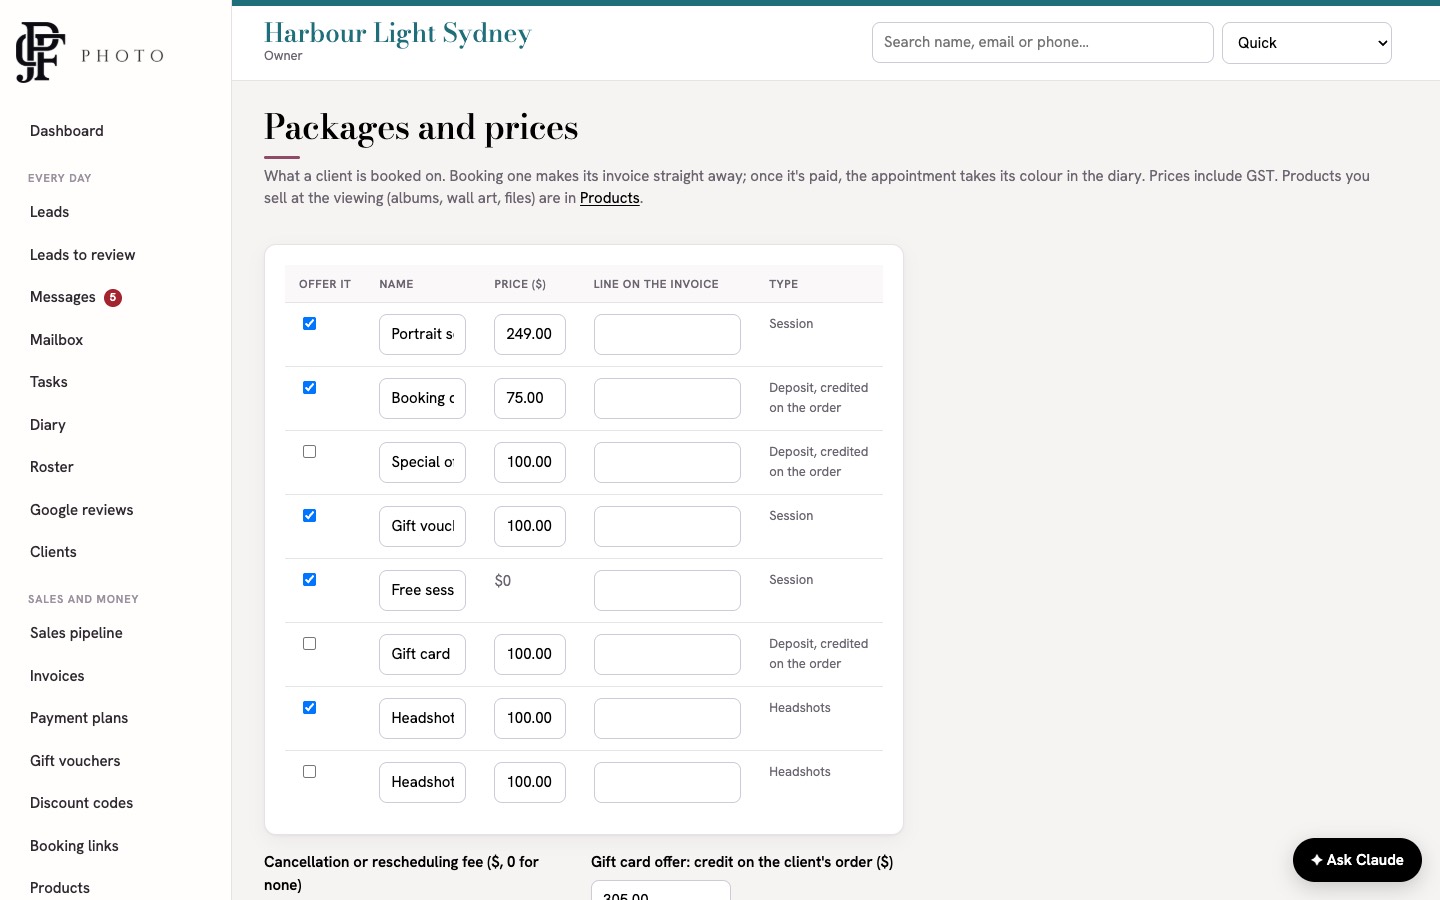
Packages are what a client is booked on, such as a session fee, a deposit, a special offer or headshots. Booking one makes its invoice straight away.
- Open Studio setup → Packages and prices.
- For each package, tick Offer it, then set its name, price (including GST) and the line shown on the invoice.
- Set the cancellation or rescheduling fee (0 for none).
- If you use the gift card offer package, set the credit it gives on the client's order.
- List your types of shoot, one per line (for example Portrait, Family, Newborn).
- Click Save.
Deposits are credited on the client's later order automatically. Products you sell at the viewing (albums, wall art, files) go in Products, not here.
6.4 Shoot times
Online bookings only offer the times you set here.
- Open Diary → Shoot times & closures (also a step in the setup wizard).
- For each day, tick Shoots and type the start times, separated by commas (for example 9am, 11am, 1:30pm). Untick Shoots for a day with no shoots.
- Set the office and phone hours for each day.
- Click Save the week.
- To close a day or a few days, fill in Close a day (or a few): from, to (optional), why, and whether it's no shoots or office closed. Click Close.
6.5 Products
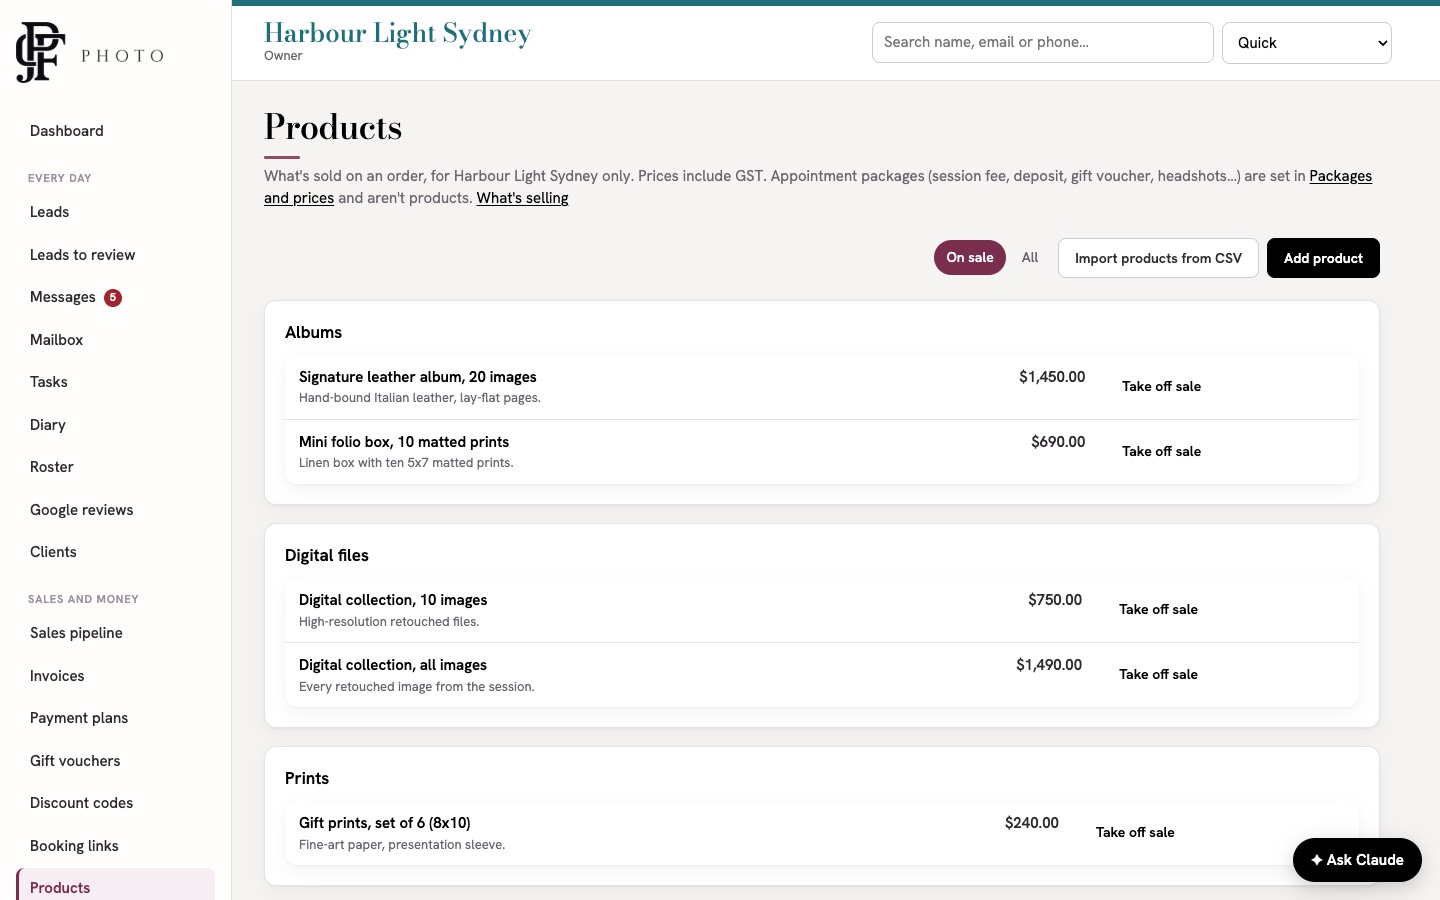
Products are what you sell on an order: albums, wall art, prints and digital files. They're also used by PJFC Reveal in the viewing room.
- Open Sales and money → Products.
- Click Add product. Enter its name, group (for example Albums or Wall art), description and price including GST. Save.
- To load many at once, click Import products from CSV.
- To stop selling one without losing its history, click Take off sale.
6.6 Importing clients from a spreadsheet or GoHighLevel
Imported clients are not treated as new enquiries. Nobody is sent anything, and no follow-ups start.
From a spreadsheet (CSV)
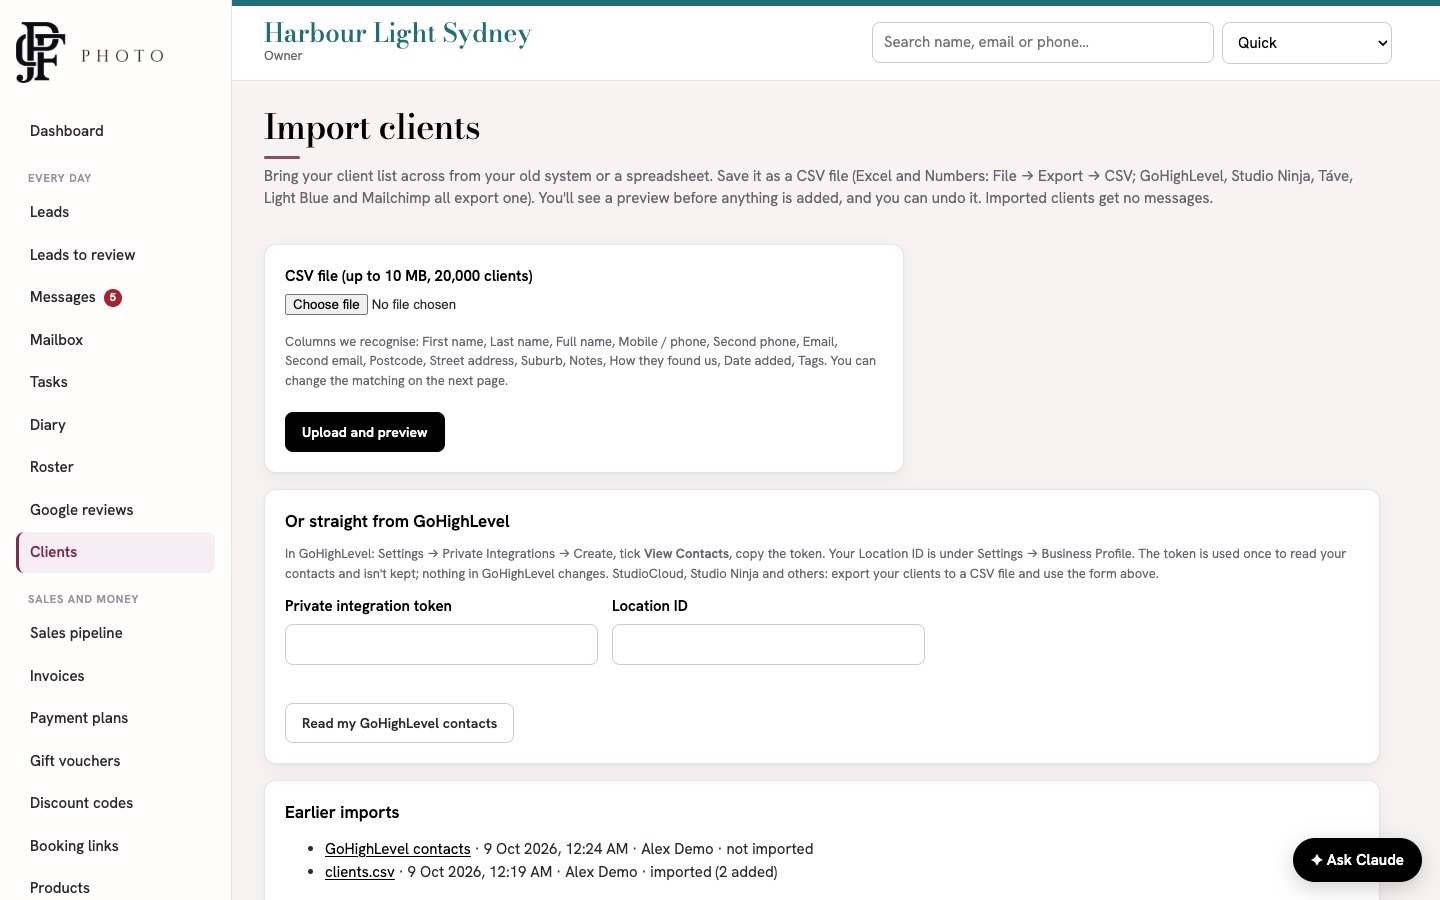
- Export your client list as a CSV file. In Excel or Numbers: File → Export → CSV. GoHighLevel, Studio Ninja, Táve, Light Blue and Mailchimp can all export one.
- Open Clients → Import from a spreadsheet (or the setup wizard step).
- Choose the file (up to 10 MB and 20,000 clients) and click Upload and preview.
- Check which column is which. PJFC Photo recognises first name, last name, full name, mobile, second phone, email, second email, postcode, street address, suburb, notes, how they found us, date added and tags. Change any that are wrong.
- The preview shows how many are new, how many are already in PJFC Photo, and how many can't be used. Click to import.
- Made a mistake? Click Undo on the import. It removes the clients that import added, unless someone has since given them a lead, booking or invoice.
Straight from GoHighLevel
- In GoHighLevel, go to Settings → Private Integrations → Create. Tick View Contacts and copy the token.
- Find your Location ID under Settings → Business Profile.
- In PJFC Photo, paste both into Or straight from GoHighLevel and click Read my GoHighLevel contacts.
- Check the preview and import, as above.
The token is used once to read your contacts and isn't kept. Nothing in GoHighLevel changes.
6.7 Adding staff and roles
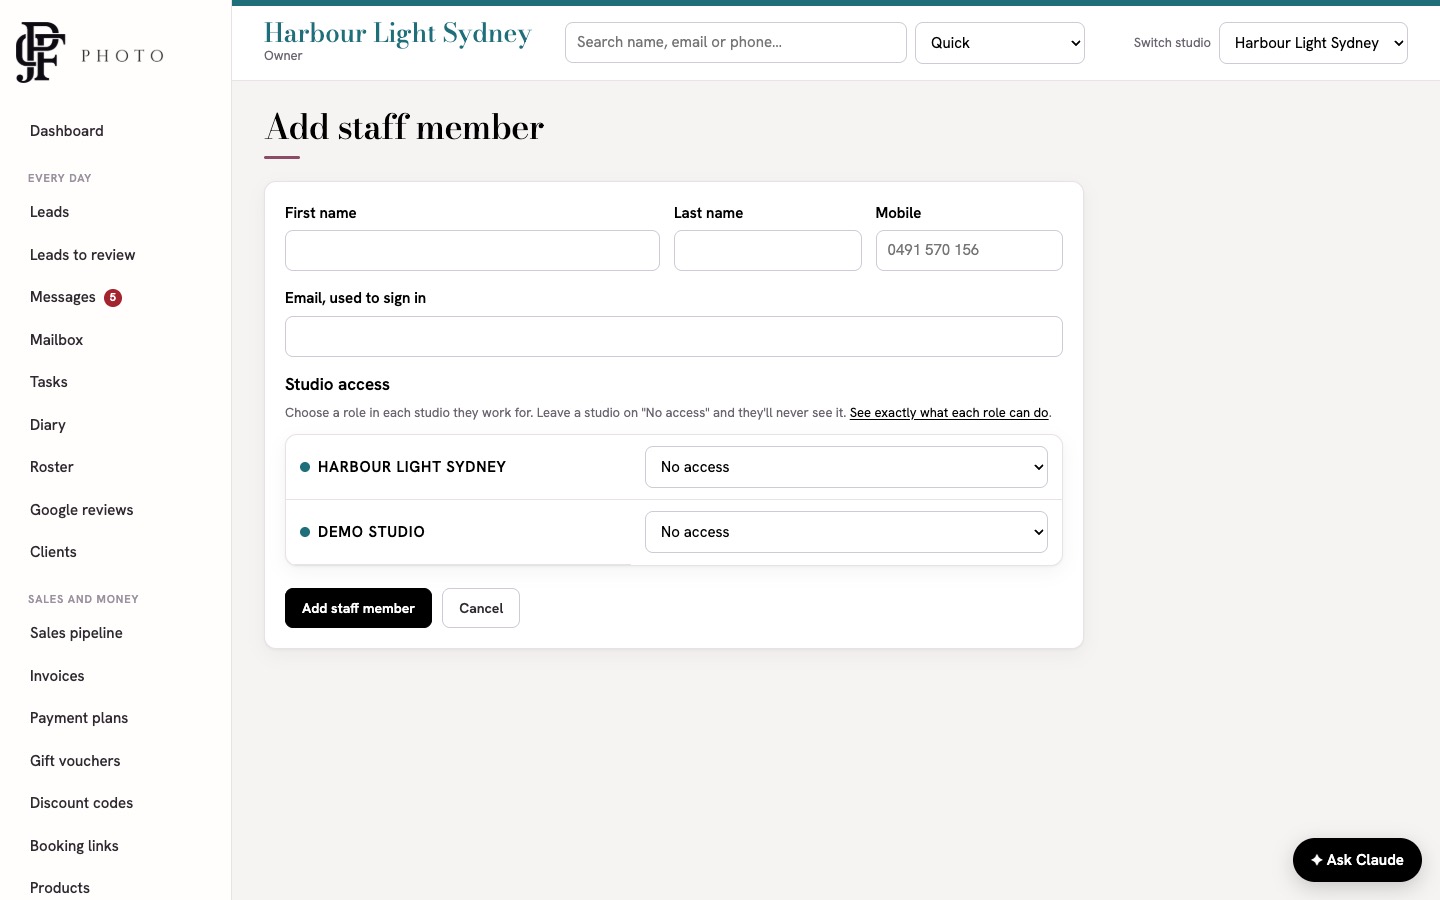
- Open Staff → Staff access and click Add staff member.
- Enter their first name, last name, mobile and the email they'll sign in with.
- Choose their role in each studio. Leave a studio on "No access" and they'll never see it.
- Click Add staff member. PJFC Photo shows a temporary password once. Give it to them privately. They change it the first time they sign in, then set up their second sign-in step.
Roles: Company director or partner, Studio manager, Booking consultant, Image consultant / photographer, Production, Accounts and Marketing. The business owner (Group owner) sees every studio and Billing.
- Roles (Staff → Roles) shows every permission against every role, for the studio you're in. Change a tick to change it for everyone in that role.
- On a person's page you can allow or deny single permissions just for them.
- View as lets you see PJFC Photo exactly as someone else sees it. It's read-only and recorded in the activity log.
- Your plan sets how many staff logins you can have (see section 4).
6.8 Connections: texts, card payments and email
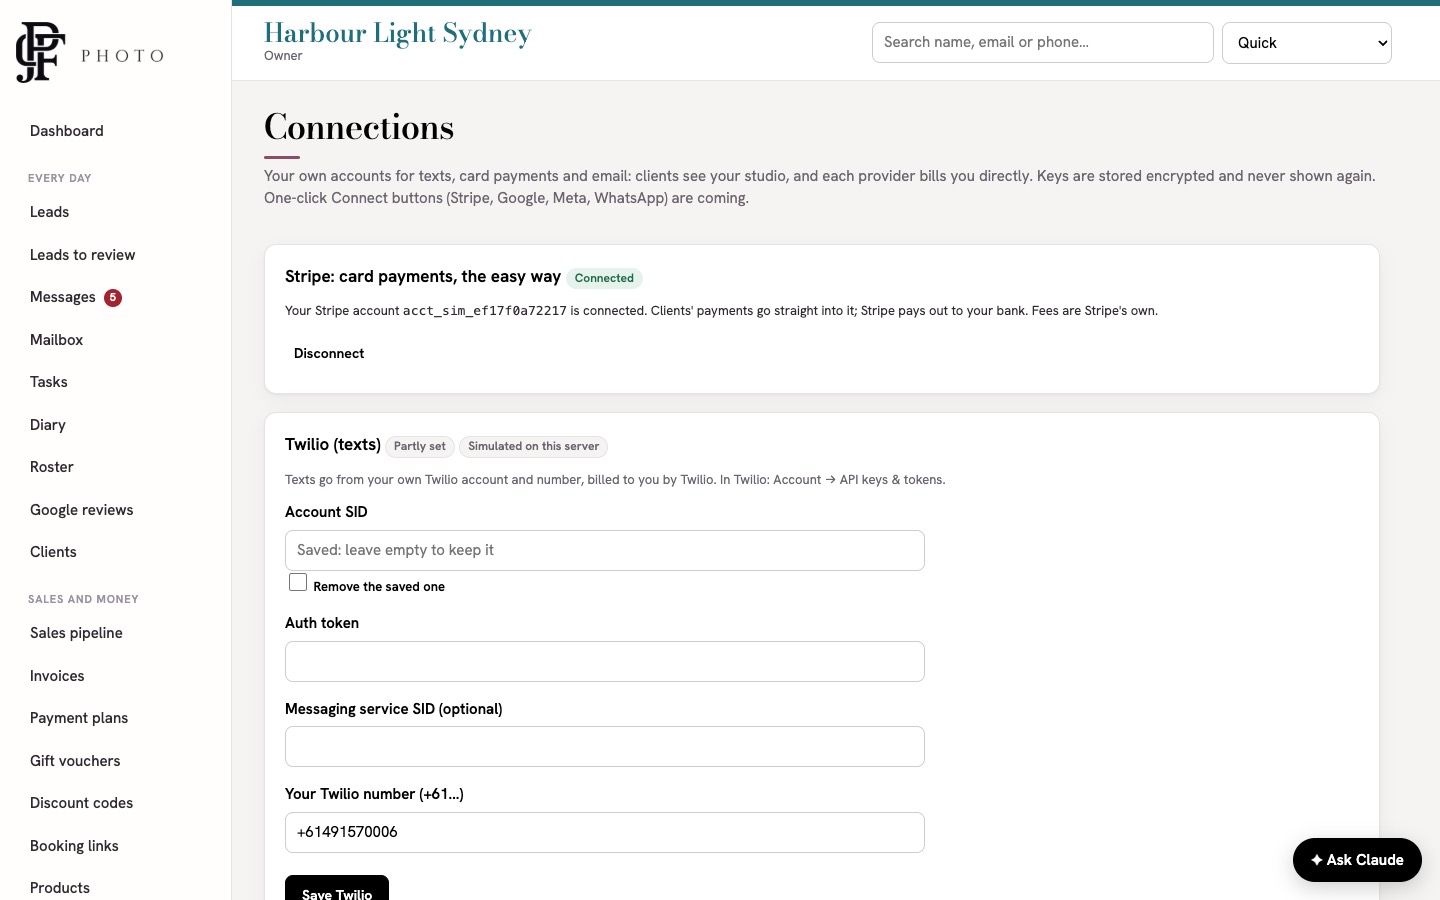
Connections link PJFC Photo to your own accounts. Clients see your studio, and each provider bills you directly. Keys are stored encrypted and never shown again. Open Studio setup → Connections.
Connect Stripe (one click)
- Click Connect Stripe.
- Sign in to Stripe (or create an account) and approve the connection.
- You come back to Connections, which shows Connected. Clients' payments go straight into your Stripe account, and Stripe pays out to your bank.
Advanced: instead of Connect Stripe, you can type your own Stripe keys (secret key, publishable key and webhook signing secret). The page tells you the webhook address to add in Stripe.
Twilio (texts)
- In Twilio, go to Account → API keys & tokens. Copy your Account SID and Auth token.
- Paste them into the Twilio section. Add a Messaging service SID if you use one (optional).
- Enter your Twilio number (+61…) and click Save Twilio.
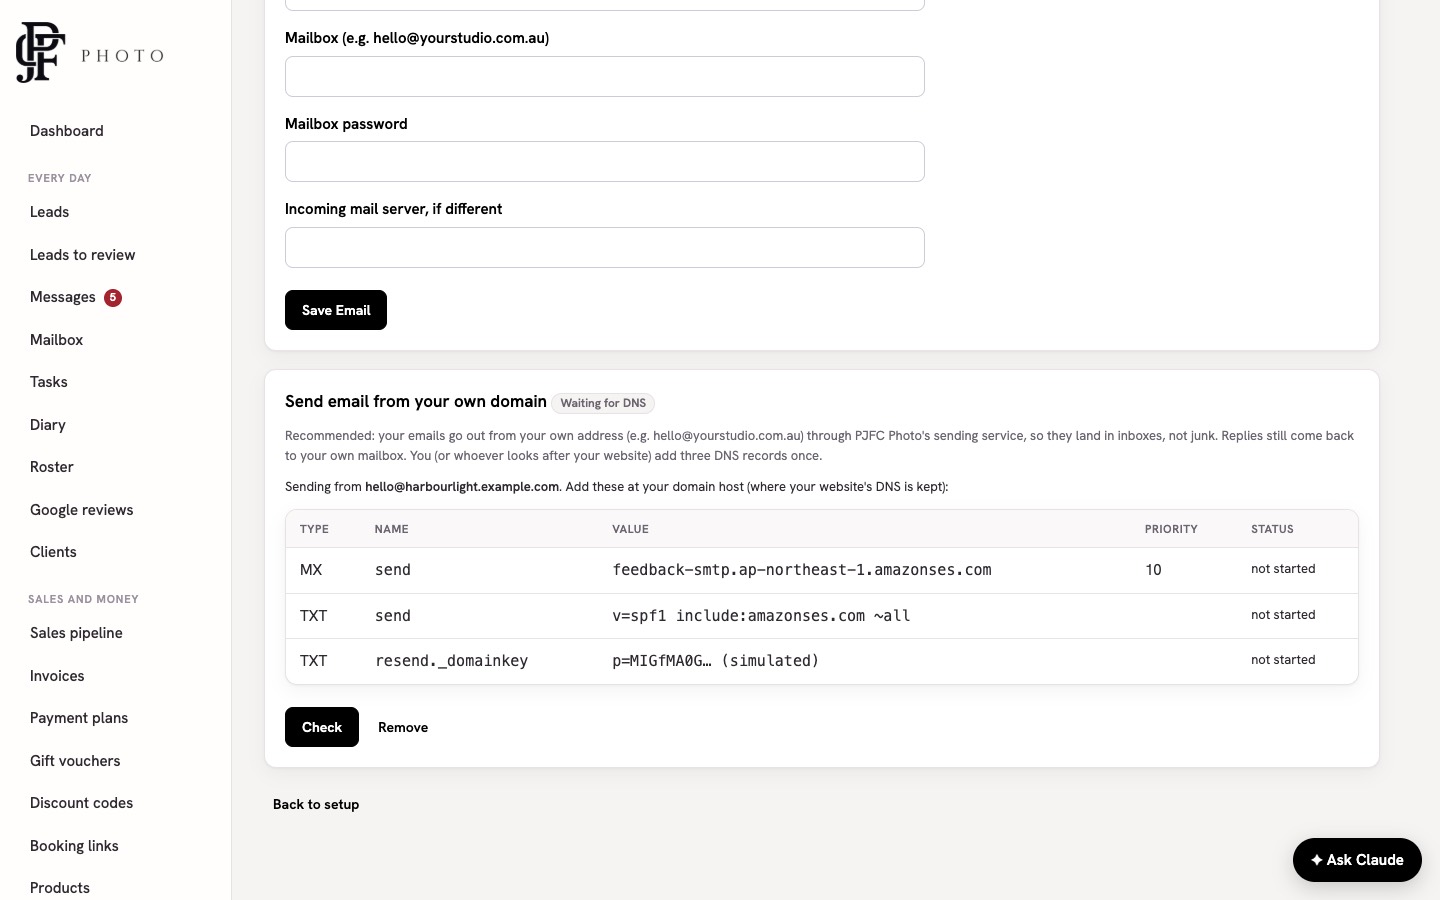
Email (your studio mailbox)
- Enter your mail server, mailbox address and mailbox password. Add the incoming mail server if it's different.
- Click Save Email. Emails to clients go from your address, and replies come back into Messages.
Send email from your own domain (recommended)
- In Send email from your own domain, enter your address (for example hello@yourstudio.com.au) and add it.
- PJFC Photo shows three DNS records. Add them where your website's DNS is kept, or send them to whoever looks after your website.
- Click Check. Once the records are found, your emails go out from your own address and land in inboxes, not junk. Replies still come back to your own mailbox.
To leave a saved key in place, leave its box empty. To delete one, tick Remove the saved one and save.
Coming soon
- One-click Meta: Facebook and Instagram lead forms and messages. Coming soon
- One-click Google (Google Business Profile, reviews and Analytics). Coming soon
- One-click WhatsApp. Coming soon
6.9 Leads and calling
New enquiries arrive in Leads. They come from your website's enquiry form (see Settings → Website), your online booking pages, and clients you add yourself.
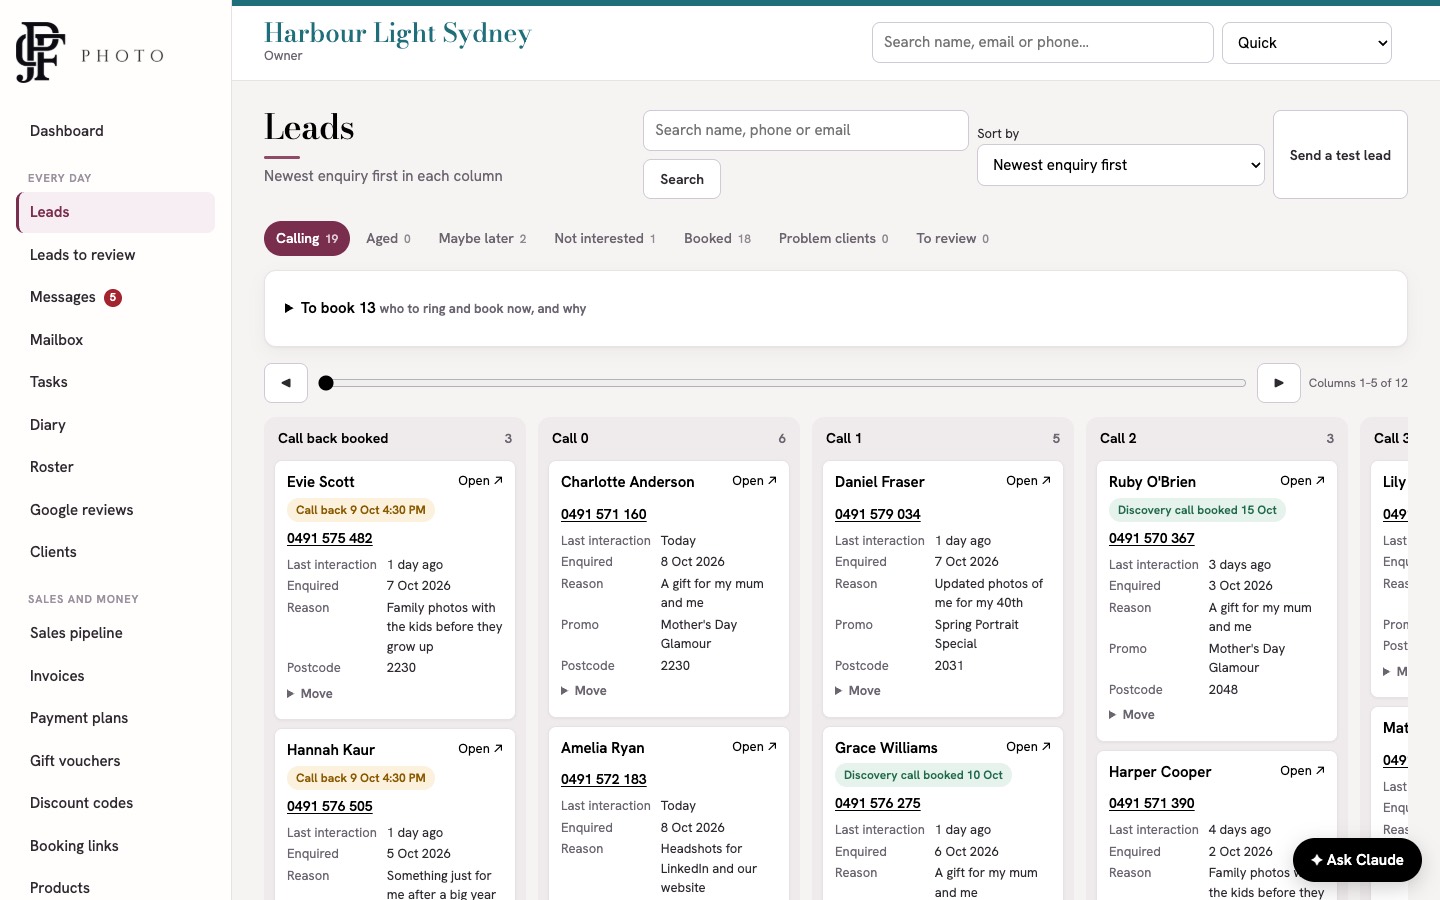
The leads board
- New enquiries start in Call 0. Each call you log moves them along (Call 1, Call 2 … Call 10+).
- Leads not booked after 10 calls move to Aged 60, 90 and 120.
- Use the tabs to see Calling, Aged, Maybe later, Not interested, Booked, Problem clients and To review.
- Search, or sort by newest, oldest, campaign, longest since last contact or name.
Calling a lead
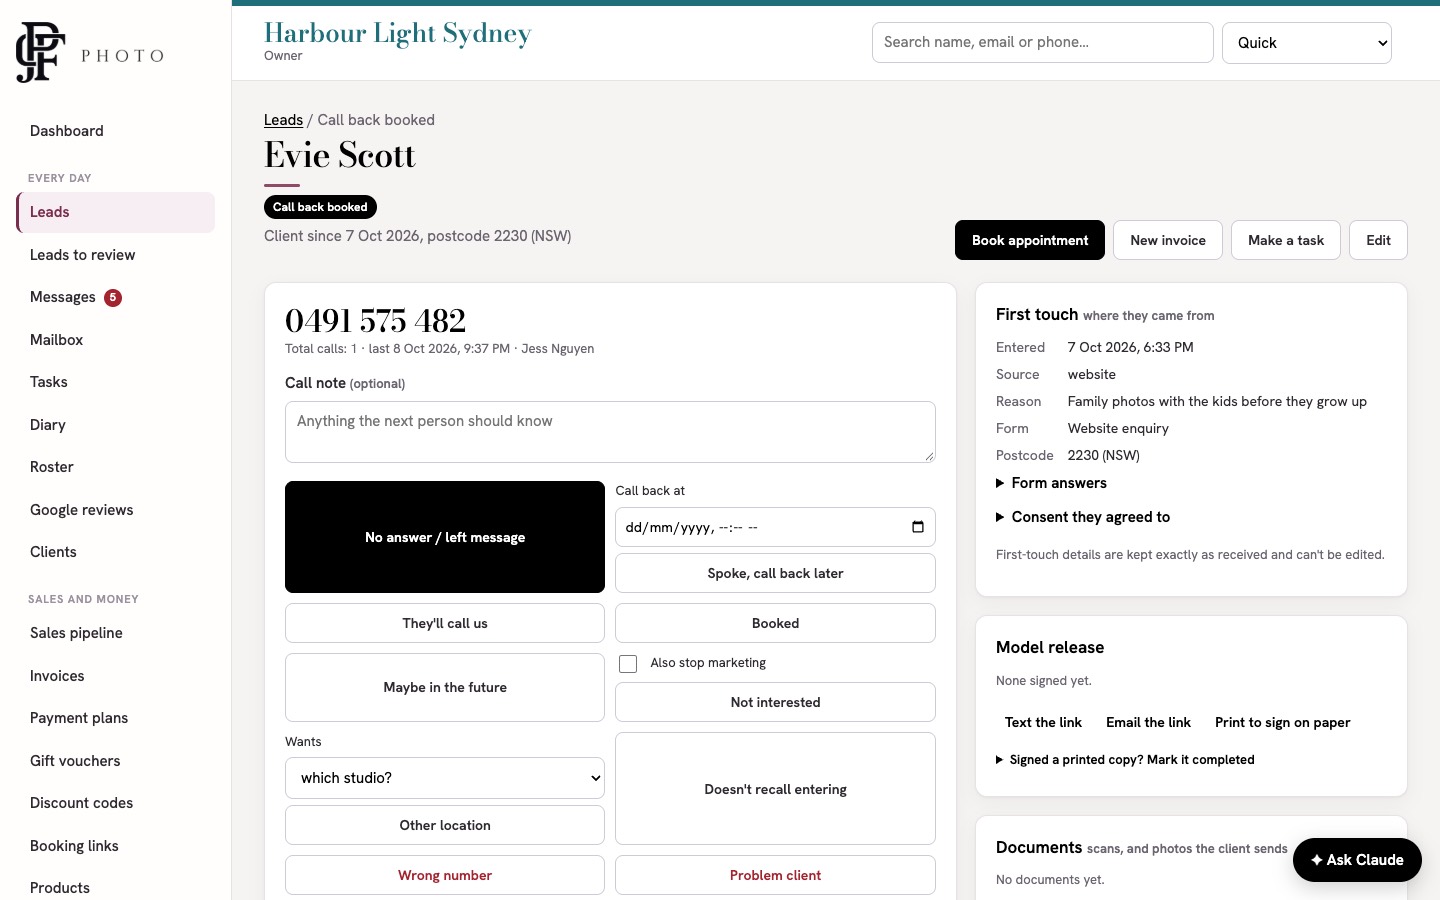
- Click a lead to open its card.
- Tap the phone number to call. It opens your phone or calling app.
- Type a call note for the next person.
- Log what happened:
- No answer / left message: you're offered a text to send.
- Spoke, call back later: pick the time, and a callback task is made.
- They'll call us: the lead waits, and you get a task to check in 2 days.
- Booked: opens the booking form.
- Maybe in the future, Not interested (tick "Also stop marketing" if they ask), Wrong number, Other location, Doesn't recall entering or Problem client.
Calls aren't recorded, so log every call by hand from the lead card. Made a mistake in a note? Click Fix the note under the call.
6.10 Messages
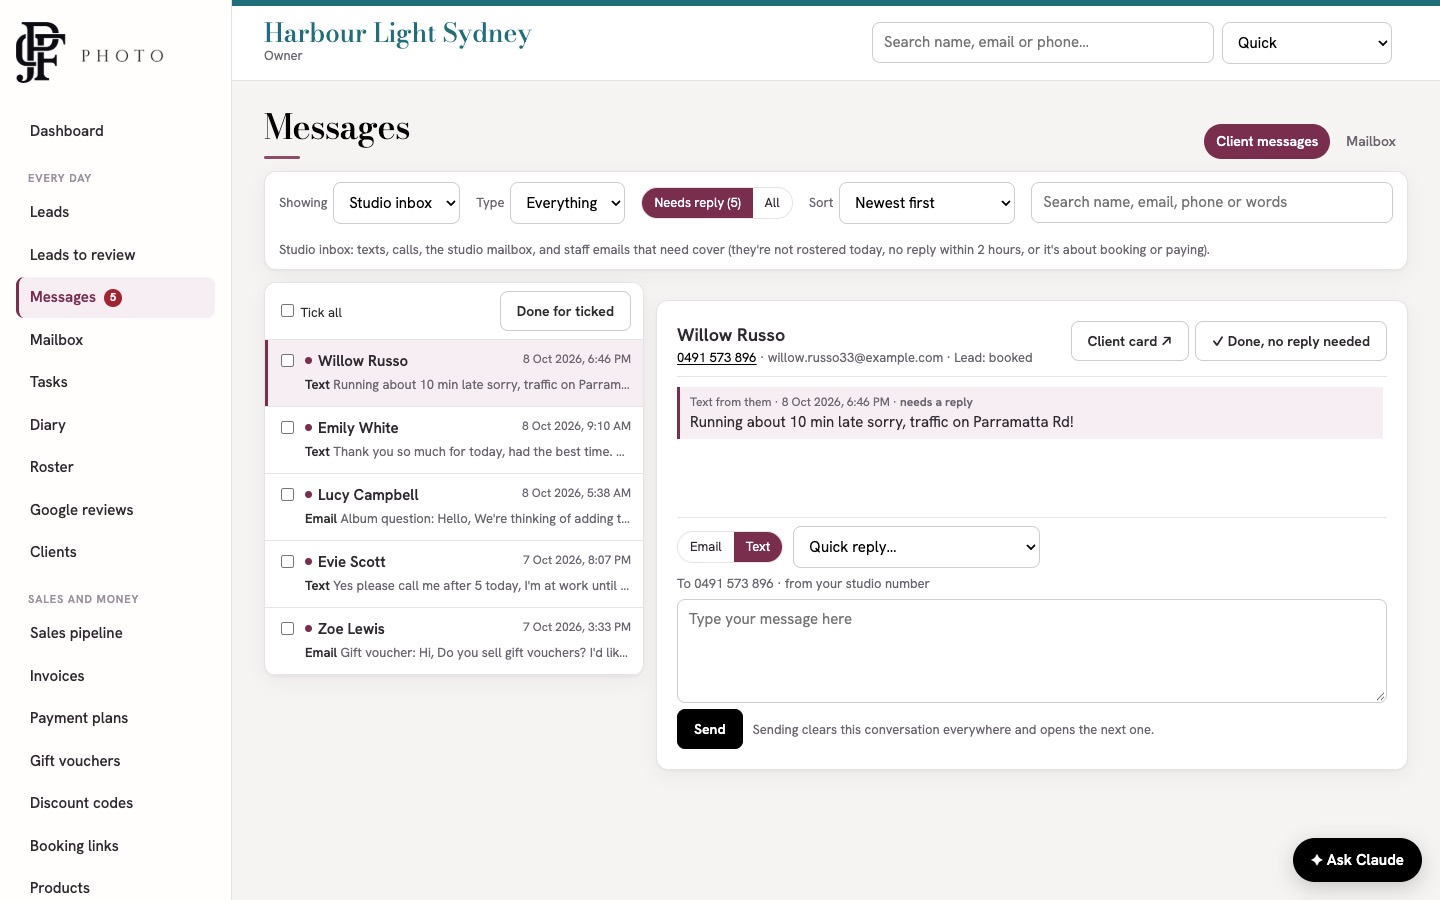
Messages shows every client conversation in one place: texts, calls and emails.
- Open Messages. Needs reply shows conversations waiting on you.
- Filter by studio inbox, your mailbox or everyone, and by type.
- Click a conversation, type your reply and send. Texts go through your studio's Twilio number.
- If no reply is needed, click ✓ Done, no reply needed. Tick several and click Done for ticked to clear many at once.
- A client who replies STOP has their marketing stopped automatically.
- Spam number? Open it and click 🚫 Mark as spam. Its texts are put away, not deleted.
- Message templates holds every text and email. Edit the words, or use Edit design for emails.
- Follow-up schedules are the automatic messages (welcome, reminders, follow-ups). Switch each one on or off.
6.11 Diary and bookings
Book an appointment
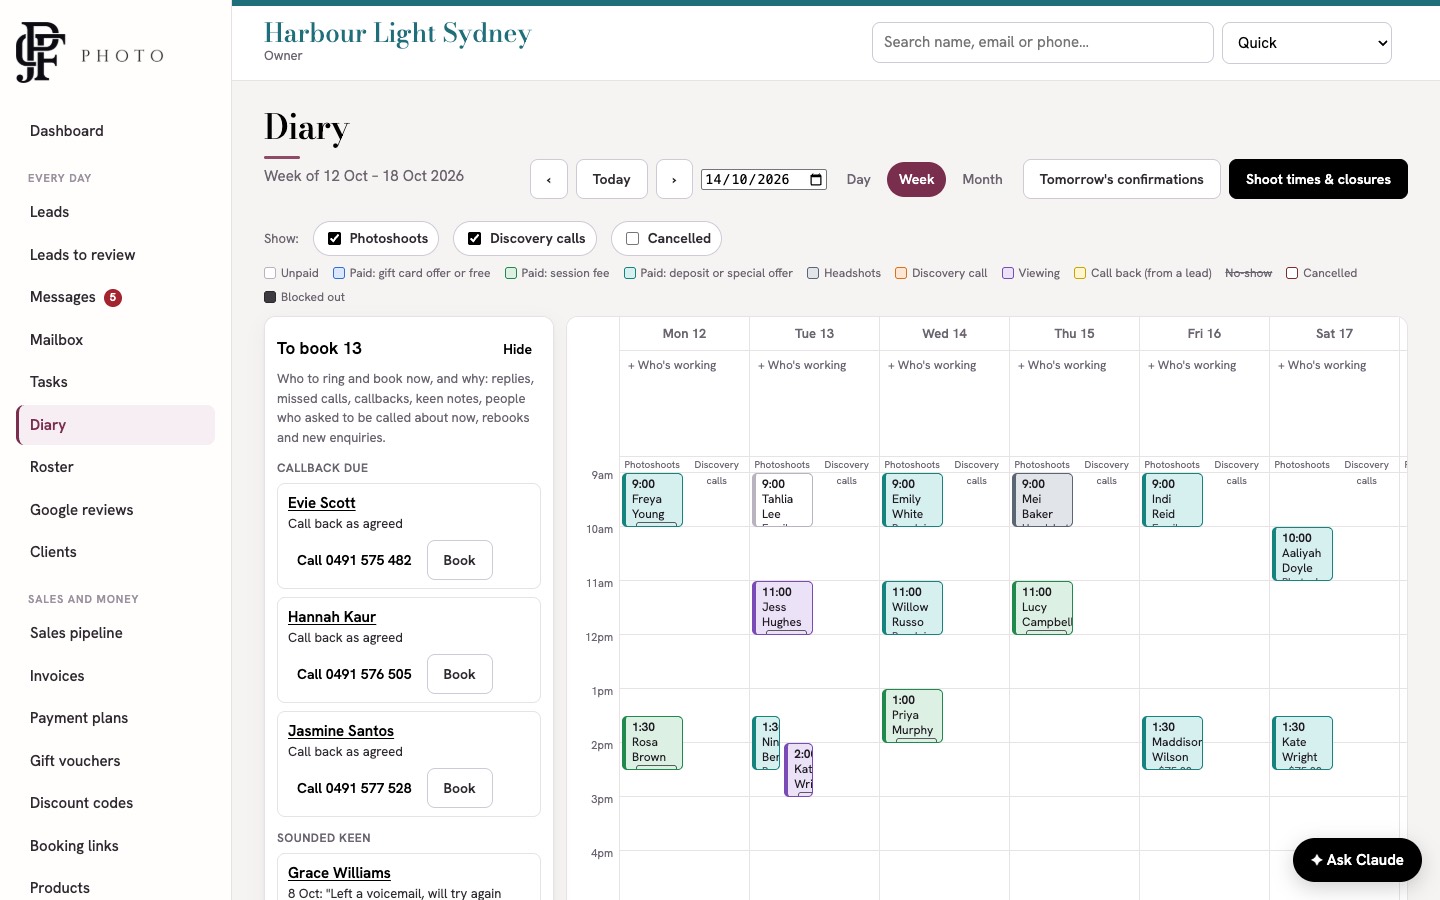
- From a lead choose Booked, or click an empty time in the Diary, or click Book on a client or in the To book list.
- Choose the type: photoshoot, discovery call, viewing or corporate headshots.
- Choose the package, the type of shoot, the day and the time.
- Save. If the time clashes, you're warned and can confirm.
The booking makes its invoice automatically. The client gets the booking email and reminders (once sending is on).
Confirm, move or cancel
- Open the appointment in the Diary.
- Confirm, or send the confirmation text. Tomorrow's list is under Tomorrow's confirmations.
- Reschedule: pick the new time. The client is told the new time.
- Cancel: soft (they want to rebook, a follow-up task is made) or hard (gone).
- Mark No-show or Attended. Clicked Attended by mistake? Use Undo attended.
Use Day, Week and Month views, and the Show ticks to filter. Colours show what's paid.
6.12 Online booking links
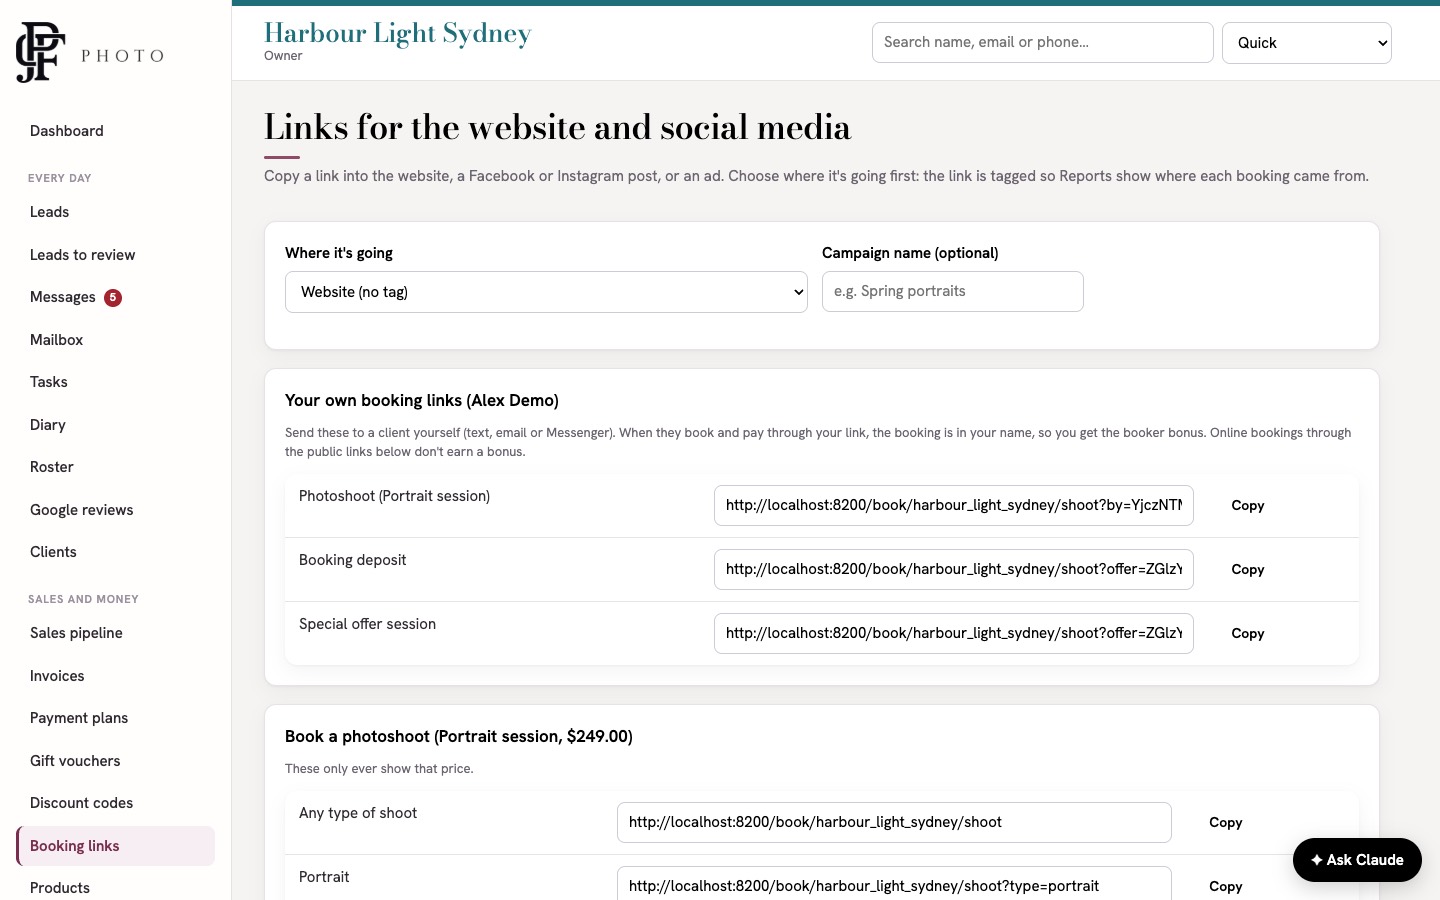
Clients can book themselves online. Open Sales and money → Booking links.
- Choose Where it's going: website, Facebook post, Instagram post, a Facebook or Instagram ad, email or Google Business Profile.
- Add a campaign name if you like.
- Click Copy next to the link you want, and paste it into your website, post or ad.
- Links are tagged, so Reports show where each booking came from.
- There are links for a photoshoot (any type, or one type such as Family or Newborn), each special offer, a free 10-minute discovery call and the gift voucher shop.
- An offer's own links are the only ones that show its price. Use them only in that offer's ad or post.
- Your own booking links are in your name. When a client books and pays through them, the booking counts for you.
- Online bookings only offer your shoot times and the packages chosen in Settings.
6.13 Invoices and payments
- Open the invoice from the client, the appointment or Invoices.
- In the payment section, choose how they're paying and click Record payment, or click Make payment link to send a link:
- Card or bank account: charge through the CRM (Stripe).
- Payment link texted or emailed to the client.
- Card processed in the studio (EFTPOS machine), cash or bank transfer. These are recorded only.
- Humm or Payright finance.
- Add a discount code on the invoice if needed.
- Use Print / PDF to print or save the invoice.
A booking deposit or gift card credit comes off an order as a deduction ("Less booking deposit already paid"). It is never added twice. All prices include GST.
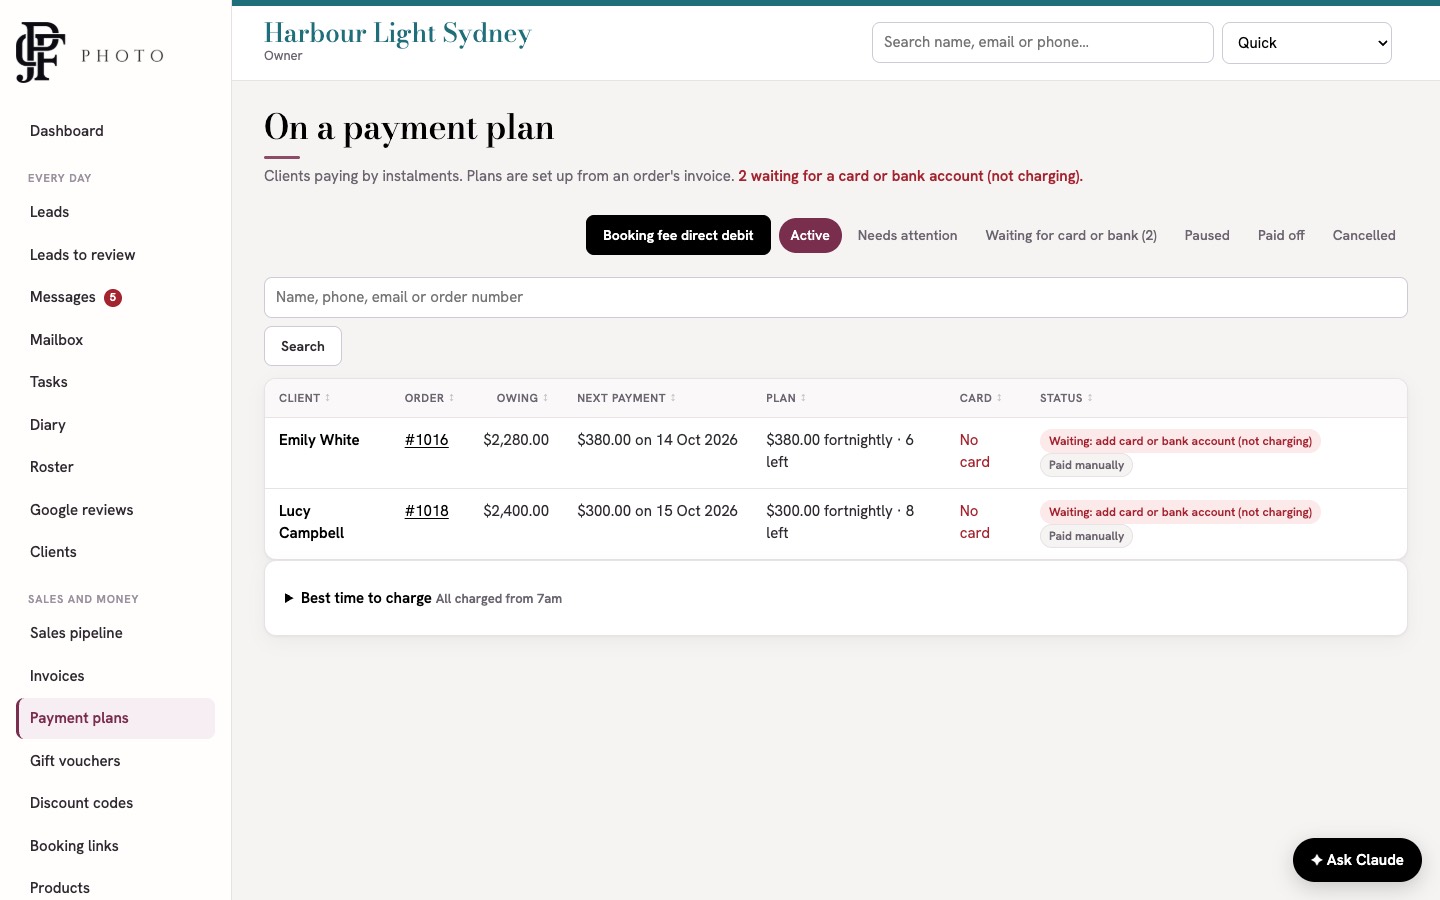
6.14 Payment plans
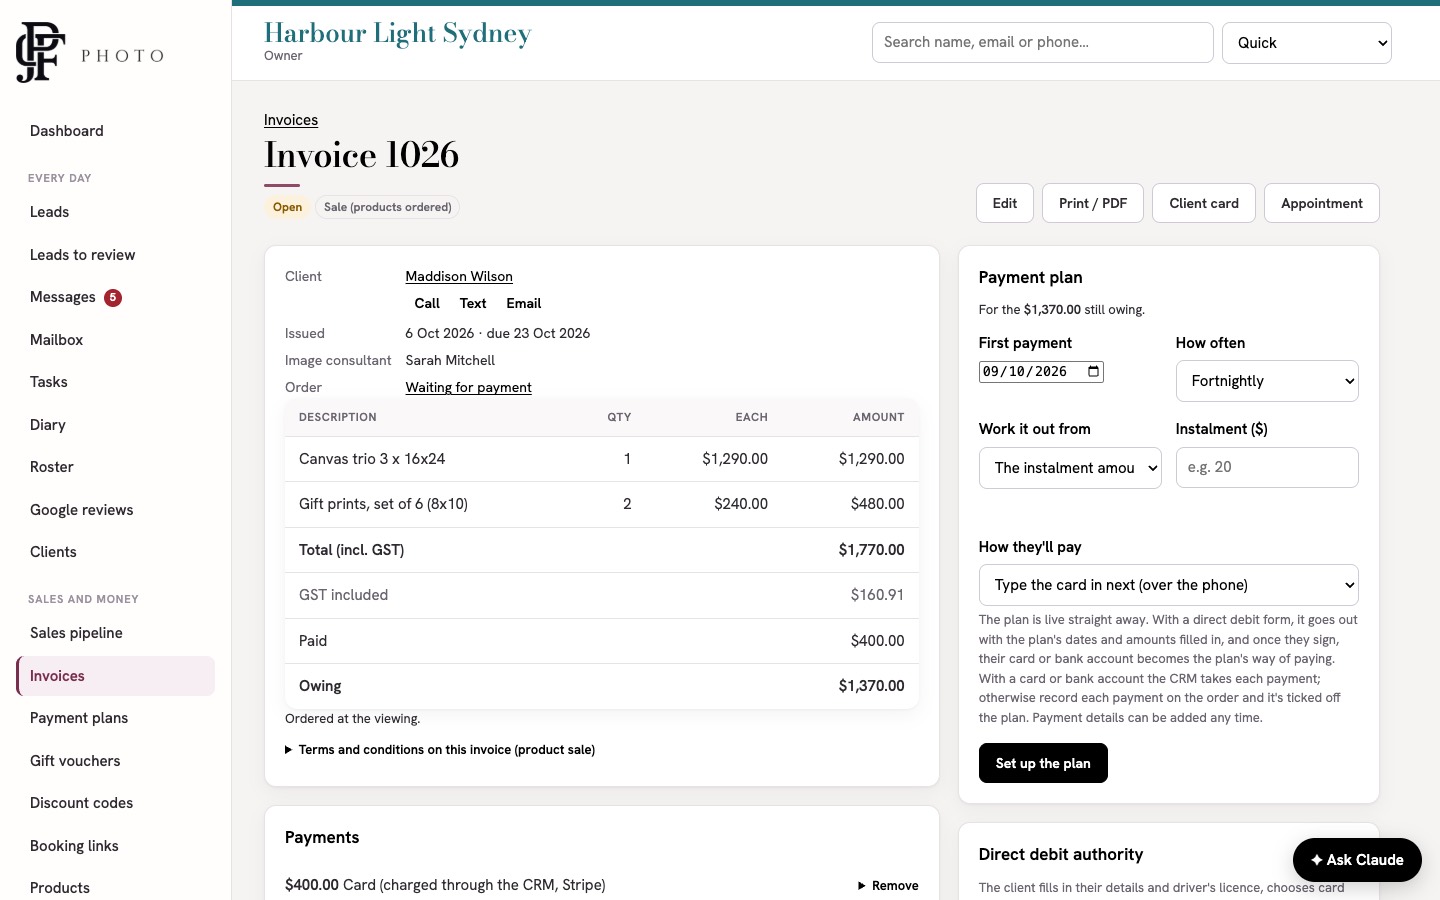
- Open an unpaid order invoice. In Payment plan, set the first payment date and how often: weekly, fortnightly or monthly.
- Choose to work it out from the number of payments or the instalment amount.
- Under How they'll pay, type the card in, send the client a secure link, or choose a direct debit form to text, email or print.
- Click Set up the plan.
- Payments are taken automatically from 7am on the day.
- The client gets a reminder text first: 7 days before a monthly payment, 3 days before weekly and fortnightly ones.
- A declined card is tried again 1, 3 and 7 days later. If it still fails, the client is texted and you get a task.
- On the plan you can pause, change amounts or dates, move a missed payment, retry now, take an extra payment, swap the card or cancel. Each change needs a reason.
- The Waiting for card or bank tab shows plans with nothing to charge yet.
- Booking fee direct debit takes a booking fee on a set date.
6.15 Gift vouchers
- Clients buy vouchers through your gift voucher shop link (in Booking links). They pay through a payment link.
- Open Gift vouchers to see every voucher: awaiting payment, paid and ready to book, booked with credit left, all used, and expired or cancelled.
- To book a voucher, book the Gift voucher package and enter its code. The voucher pays for the package it was sold for.
- Any extra credit sits on the client's file and comes off their order by itself.
- Change the voucher texts to the buyer and the person it's for in Settings.
6.16 Discount codes
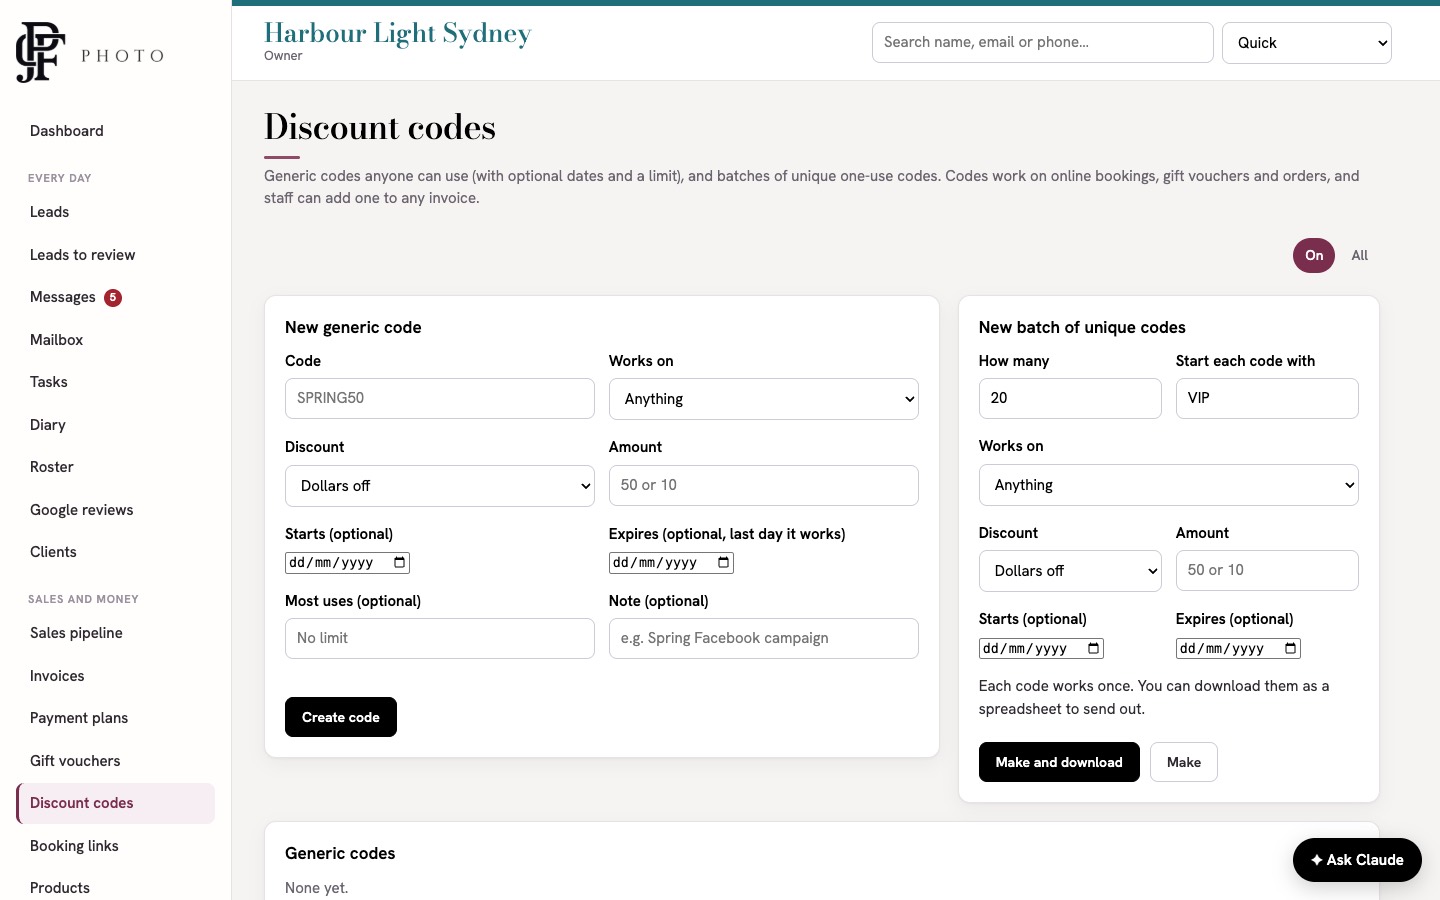
A code anyone can use
- Open Discount codes. Under New generic code, type the code.
- Choose what it works on: anything, online bookings, gift vouchers or orders.
- Choose dollars off or percent off, and the amount.
- Add start and end dates and a limit on uses if you like. Click Create code.
A batch of one-use codes
- Under New batch of unique codes, enter how many and what each code starts with.
- Set what it works on and the discount, then click Make and download to get a spreadsheet to send out.
Staff can add a code to any invoice.
6.17 Sales pipeline
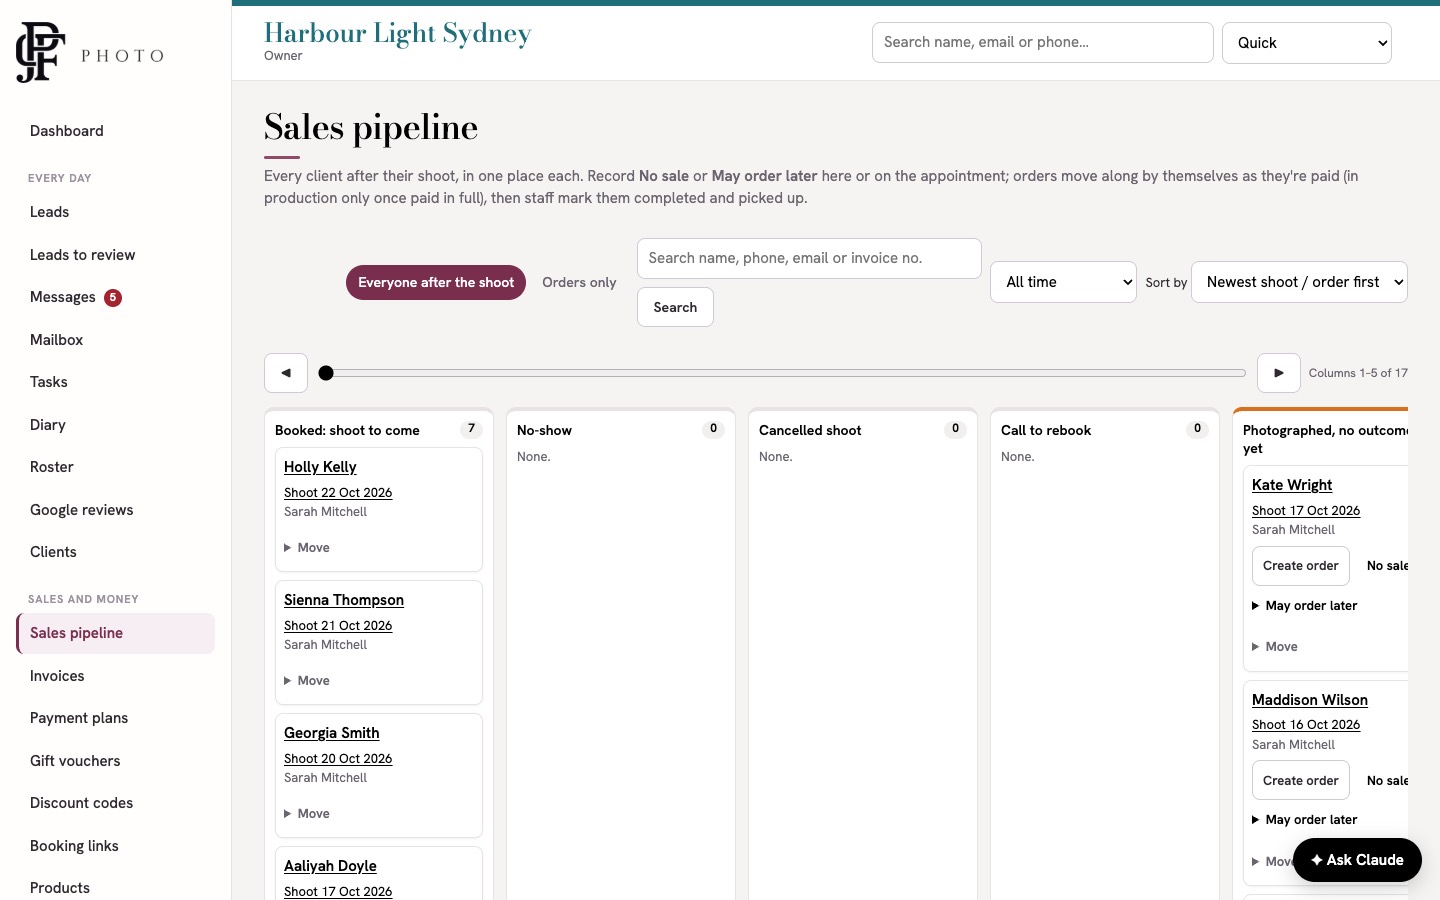
The Sales pipeline shows every client after their shoot, from booked to picked up.
- Open Sales pipeline. Clients are in columns such as Booked: shoot to come, No-show, Photographed: no outcome yet.
- After the viewing, click Create order, add the products and who sold it. Credits on file come off automatically.
- Or click No sale or May order later (with a follow-up date).
- Orders move to In production once paid in full, then Completed and Picked up. Use Move to move a card by hand.
6.18 Reports and end-of-day report
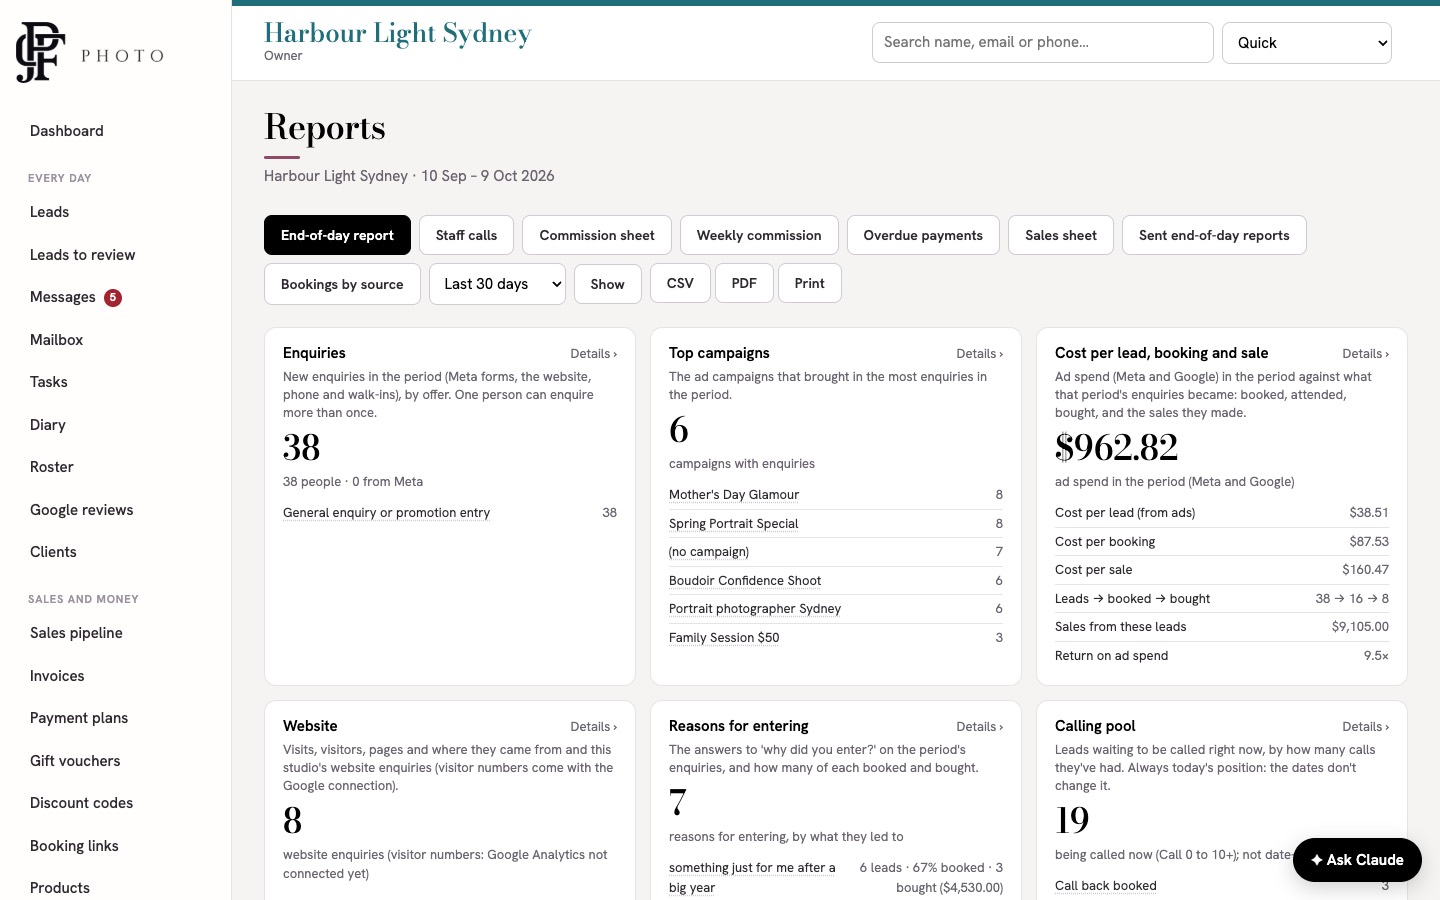
- Open Reports. Pick a period (today, last 7 or 30 days, this month, custom dates and more) and click Show.
- Each tile says what it counts. Click Details › to see the list behind it.
- Use CSV, PDF or Print if your role allows. Every download is logged.
Reports include enquiries, campaigns, cost per lead, booking and sale, the calling pool, bookings by source, staff calls, overdue payments, the sales sheet and weekly commission.
End-of-day report
- Open Reports → End-of-day report.
- Check your calls, bookings, sales and banking for the day.
- Add any notes, click Preview the email, then Send my end-of-day report.
Photographers and above attach the daily banking sheet, the daily sales sheet (only if there were orders) and commission. A manager chooses who receives it in Settings.
6.19 Ask Claude (the AI helper)
Click Ask Claude at the bottom right of any page. Type a question, or tap 🎤 Talk and speak. It only uses what you're allowed to see.
- Ask how to do something: "How do I set up a payment plan?"
- Open a page: "show me Sarah Smith", "open tomorrow's diary".
- Check things: "did the deposit invoice go?", "check today's payment plans".
- Search: "texts from today", "what's booked in December".
- Get a note or task ready: "remind me to call Sarah back on Friday". You see what it wrote with Confirm and Cancel. Nothing is saved until you click Confirm.
- Screenshots: click 📎 Screenshot, or paste or drag one in, and ask about it.
Claude never sends texts or emails for you. If an answer doesn't help, click Didn't help? and say what you were after. The owner sets a monthly spending limit in Studio setup → AI helper.
6.20 The send switch and Shadow log
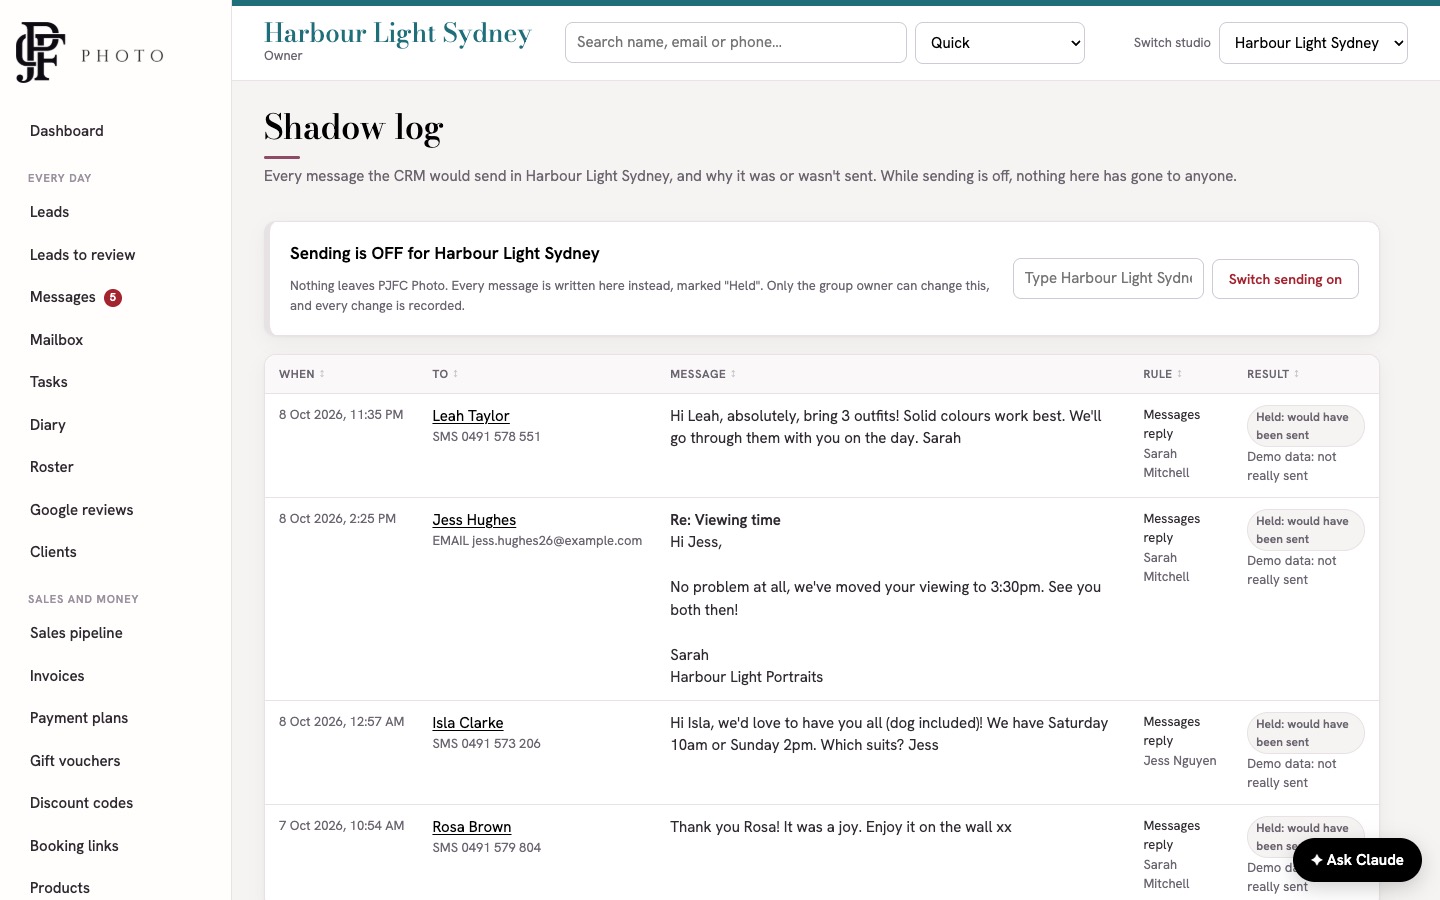
Every studio has a master send switch. It starts off. While it's off, nothing leaves PJFC Photo: no texts, no emails. Every message is written to the Shadow log instead, so you can see exactly what would have gone, to whom, and why.
- Open Messages → Shadow log.
- Read through the messages. Fix any template wording you don't like in Message templates.
- When you're ready, type the studio name to confirm and click Switch sending on.
Only the group owner can change the switch, and every change is recorded. Switch it off again the same way if you need to stop everything.
6.21 Demo studio
- Open Setup and click Make a demo studio to practise in (owner only).
- Switch to it with the studio switcher at the top.
The demo studio is filled with made-up clients, leads, bookings and invoices. Nothing in it is ever sent to anyone. Use it to train staff or try things out. You can only have one.
6.22 More than one studio
- Each studio (location) has its own clients, diary, money, settings and private database.
- To add one, open Setup and click Add another studio. Enter its name and time zone. You're switched into it to set it up.
- Your plan sets how many studios you can have: Solo 1, Studio 3.
- Staff get a role in each studio they work in. Use Switch studio at the top to move between them. Everything you see is for the studio you're in.
- If a lead wants another studio, log Other location and pass them on. Nothing moves between studios automatically.
7. Settings reference
Where to find each setting. Most are for owners and managers.
| Page | What it sets |
|---|---|
| Setup | The setup checklist, adding a studio, the demo studio. |
| Studio details | Name, business name, legal entity, ABN, phone, email, address, website, time zone, who signs welcome messages, studio colour, logo. |
| Packages and prices | Packages offered, prices, invoice lines, cancellation fee, gift card credit, types of shoot. |
| Shoot times & closures (Diary) | Shoot start times, office hours, closed days. |
| Products | What's sold on orders and their prices. |
| Connections | Connect Stripe, Stripe keys, Twilio, studio mailbox, send email from your own domain. |
| Settings | Invoice details, Twilio number, commission %, monthly sales budget, invoice due days, booker bonus, end-of-day recipients, invoice terms, gift voucher texts, online booking packages, payment plan self-service, commission approval, discovery call hours, Google review link, lead rules, welcome delay. |
| Website | The enquiry form code to give your web designer. |
| Message templates | Every text and email, quick replies, missed-call texts. |
| Follow-up schedules | Automatic messages on or off, and the go-live preview. |
| Staff access / Roles | Staff logins, roles per studio, single permissions, View as. |
| Staff mailboxes | Each staff member's own mailbox. |
| Activity log | Who did what, and when. |
| AI helper | Ask Claude's monthly budget and usage. |
| Billing | Plan, trial end date, licence key, Export all my data (owner only). |
| Account → Sign-in security | Your password, second sign-in step, passkeys, remembered devices. |
Lead rules (in Settings)
- Red tag: a returning person whose last enquiry is older than this many days starts again at Call 0 with a red tag.
- Overdue: leads below Call 10 with no call for this many days show as overdue on the dashboard.
- Too old, not booked: after Aged 120, leads move here after this many days since the last call.
- Welcome delay: 0 sends the welcome text and email the moment a lead arrives.
Invoice terms changes apply to new invoices only. Each invoice keeps the terms it was issued with.
8. Tips and tricks
- Start in the Shadow log. Leave sending off for a few days and read what would have gone. It's the safest way to go live.
- Train in the demo studio. New staff can click anything without risk.
- Use View as to check a new staff member sees the right things.
- Add Face ID / Touch ID. It's faster than typing codes, and safer.
- Work the To book list in the Diary first thing each morning.
- Always write a call note. The next person to call will thank you.
- Tag your links. Choose "Where it's going" before copying a booking link so Reports show what's working.
- Search from anywhere. Type a name, phone or email in the top bar.
- Notes save as you type. The box says "Saved".
- Fix, don't fake. Remove a task made by mistake with Made by mistake? Remove it rather than marking it done.
- Ask Claude about the page you're on. "This client" works, because it knows where you are.
- Send email from your own domain. Your emails are far less likely to land in junk.
9. Troubleshooting
| Problem | Fix |
|---|---|
| The sign-up page says it's invite-only. | Enter the invite code you were given. No code? Email hello@pjfcsolutions.com. |
| The confirmation email didn't arrive. | Check junk. Ask for it again from the sign-up page. The link works for 3 days. |
| "That code didn't match" when setting up the authenticator app. | Check the time on your phone is set automatically, and type the newest code. |
| I don't have my phone for the second step. | On the sign-in page, choose another way, such as a code by email. |
| Nothing is being sent to clients. | Sending is probably off. Check the Shadow log. Also check Twilio and email are connected in Connections. |
| Texts don't send. | In Connections, check your Twilio Account SID, Auth token and number (+61…). |
| Emails go to junk. | Set up Send email from your own domain and click Check until all three records are found. |
| DNS records still show "not started". | DNS can take a few hours to update. Check the records were added exactly as shown, then click Check again. |
| A card payment didn't go through. | Check Stripe shows Connected in Connections. Try again, or send the client a payment link. |
| A payment plan isn't charging. | Look in the Waiting for card or bank tab. Add a card or send the client the secure link. |
| Online booking shows no times. | Check Shoot times & closures. Make sure Shoots is ticked and start times are entered, and the day isn't closed. |
| A package doesn't show online. | Tick Offer it in Packages, and check the online booking packages in Settings. |
| A staff member can't see a page. | Check their role in that studio in Staff access, and use View as to see what they see. |
| "Not found" after switching studio. | The record belongs to another studio. Switch back to that studio. |
| I can't add another studio or staff member. | You've reached your plan's limit. Change plan in Billing. |
| "That licence key was not found." | Copy the key again from your email or PJFC Solutions account. Check for spaces. |
| Staff can't sign in. | Your trial or subscription may have ended. Check Billing and enter or renew your licence. |
| I imported the wrong file. | Open the import under Earlier imports and click Undo. |
| A client asked us to stop texting. | A STOP reply does it automatically. Otherwise set Stop marketing under Flags on their client card. |
10. FAQ
Do I need to install anything?
No. PJFC Photo runs in your web browser on a computer, tablet or phone.
Will clients get messages while I'm setting up?
No. Sending starts switched off. Imported clients are never sent anything. You switch sending on when you're ready.
Who pays for texts and card fees?
You do, directly to Twilio and Stripe. PJFC Photo doesn't add a margin, and payments go straight into your own Stripe account.
Can I use Facebook and Instagram lead forms?
One-click Meta connections for lead forms and messages are coming soon. For now, leads come from your website form, online booking pages and clients you add.
Does it connect to Google or WhatsApp?
One-click Google and WhatsApp connections are coming soon.
Are calls recorded?
No. Log each call by hand on the lead card.
Can staff only see their own studio?
Yes. Give them a role only in the studios they work in. Leave the others on "No access".
Can Claude send messages or change things on its own?
No. Claude never sends texts or emails. Anything it gets ready, such as a note or task, waits for you to click Confirm.
Does it work with PJFC Reveal?
Yes. Your product list is used by PJFC Reveal in the viewing room.
Are prices shown with GST?
Yes. All prices in PJFC Photo include GST, and invoices show the GST included.
Can I get all my data out?
Yes. The owner clicks Export all my data in Billing for a zip of CSV files covering every studio, plus uploaded documents. It works any time, and for 30 days after cancelling.
How do I cancel?
See section 11.
11. Updates, backups and your data
Updates
PJFC Photo is hosted, so updates arrive automatically. There's nothing to download or install.
Where your data lives
- PJFC Photo is hosted in Sydney, Australia.
- Each studio has its own private database. Other businesses can never see your data.
- Connection keys are stored encrypted and never shown again.
- Sign-ins need a second step, and actions such as exports and View as are recorded in the activity log.
Backups
Every studio's database is backed up every night. Backups are kept for 14 days, in Sydney.
Exporting your data
- Clients: click Export CSV on the Clients page (if your role allows).
- Reports: download any report as CSV or PDF.
- Invoices: print or save any invoice as a PDF.
Export all your data (owner only)
- Open Billing.
- In the Your data panel, click Export all my data.
- A zip file downloads. It has one folder per studio, with one spreadsheet (CSV) per table: clients, enquiries, bookings, invoices, payments, payment plans, messages, notes and products. Uploaded documents are included too.
You can export at any time, and for 30 days after cancelling.
If you cancel
- You can cancel at any time, from your PJFC Solutions account or by emailing us. You keep access to the end of the period you've paid for.
- After that, you have 30 days to export your data with Export all my data in Billing.
- After 30 days, your data is deleted. Backups roll off within a further 14 days.
The terms and privacy policy have the full details.
12. Getting help
- Ask Claude: the button at the bottom right of every page answers most how-to questions straight away.
- Report a problem: the link at the bottom of every page sends a note to the PJFC Photo team, with the page you were on.
- Email us: hello@pjfcsolutions.com. Tell us your business name and what you were doing. Please don't send passwords or keys.
PJFC Photo is made in Australia by PJFC Solutions.